The User Interface
TMS Data Modeler offers a clear and intuitive user interface using Ribbons and tabs to organize and edit all database information.
UI Overview
TMS Data Modeler Home organizes application options into Ribbons, keeping the most used tools at hand when visualizing or editing any part of the project. Contextual tabs are enabled when specific objects are selected, allowing improved usability.
The Project Explorer on the left allows you to visualize your whole project easily, listing object types that when selected show all items in a clear structure. To edit or view details of any of the project items, you just have to double-click.
When selecting an item by double-clicking, the item tab will open in the Workspace, on the right. The workspace may contain one or more tabs, and each tab is subdivided into sections to offer a clear and efficient view of the selected object.
The Message window shows notifications when validating a project, such as warning and error messages.

Ribbons
TMS Data Modeler's interface is organized into Ribbons, which group all related features in one place, improving usability and making those features extremely accessible.
File Menu
A simple menu offers general project options, while the panel on the right lists projects that have been recently worked on for selection.
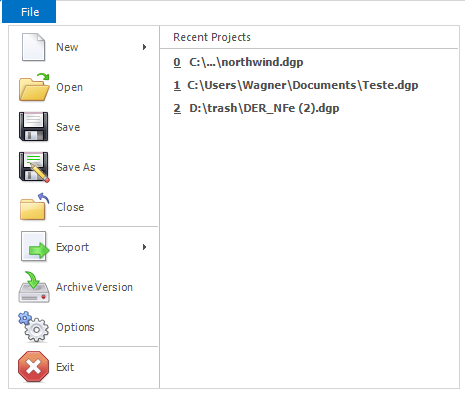
| Menu Option | Description |
|---|---|
| New | Offers the options of creating a new blank project or importing the structure of a new project from an existing database. |
| Open | Opens an existing project. |
| Save | Saves the current project. |
| Save As | Prompts a new path and file name before saving the current project. |
| Close | Closes the current project after prompting if changes should be saved. |
| Export | Exports the current model to TMS Aurelius classes. |
| Archive version | Archives the current version of the project and starts a subsequent version. Version files are saved by default in the sub-directory \versions in the project directory. |
| Options | Prompts for general environment settings. |
| Exit | Closes the current project after prompting if changes should be saved and terminates the application. |
Home Ribbon

"Project" Tab
| Option | Description |
|---|---|
| Generate script | Prompts for information to generate a script to create a database according to the current project. |
| Check | Checks project information, validating all related data such as table fields and keys. Warnings and other messages are shown on the Messages window, on the bottom of the workspace. To enable this window, select Messages Window on the Show/Hide tab. |
| Merge | Compares and allows merging of two different projects into one, by generating an impact script. |
"Create" Tab
| Option | Description |
|---|---|
| Table | Creates a new table. After selecting it, a blank table tab will open on the table editor, where you will define all of its properties. |
| Relationship | Creates a new relationship. After selecting it, the New Relationship dialog will open, where you will define all of its properties. |
| Procedure | Creates a new procedure on the project. |
| View | Creates a new view on the project. |
| Object | Drops down a menu to create extra objects as available per DBMS. You will find "Generators" available on Firebird, for example. |
| Domains | Shows existing domains information and allows editing and additions. |
"Versions" Tab
| Option | Description |
|---|---|
| Compare | Compares versions of the current project after selection, allows generation of an impact script. |
| Archive | Archives the current version of the project and starts a subsequent version. Version files are saved by default in the subdirectory \versions in the project directory. |
| Manage | Allows version management and comparisons. |
"Show/Hide" Tab
| Option | Description |
|---|---|
| Message Window | Shows or hides the message window, at the bottom of the workspace. This window lists warning and error messages when the validation tool is used. |
| Project Explorer | Shows or hides the project explorer, on the left of the workspace. |
Design Ribbon

The items on this Ribbon are only enabled when a Diagram tab is selected on the workspace.
"Insert" Tab
| Option | Description |
|---|---|
| Table | Creates a new table. After selecting it, you must drag and drop the table on the diagram. The Table editor will open for you to adjust table settings. |
| Relationship | Creates a new identifying relationship. After selecting it, you must drag the relationship line connecting parent and child tables. The Add relationship dialog will open for you to adjust relationship settings. |
| Note | Creates a new note after releasing it on the diagram tab. |
| Non-ID Relationship | Creates a new non-identifying relationship. After selecting it, you must drag the relationship line connecting parent and child tables. The Add relationship dialog will open for you to adjust relationship settings. |
"Editing" Tab
| Option | Description |
|---|---|
| Find | Show/hide the Find panel at the bottom of diagram, allowing to search for tables in diagram by table name. |
| Duplicate | Allows duplicating the selected table. |
"Zoom" Tab
| Option | Description |
|---|---|
| 100% | Sets the current diagram zoom to 100%. |
| Fit to All | Sets the current diagram zoom to a value that allows a view of the whole diagram in the current window. |
| Zoom Combo | Allows setting a specific zoom value for the current diagram. |
"View" Tab
| Option | Description |
|---|---|
| Navigator | Show/Hide the Diagram Navigator Panel. |
"Font" Tab
| Option | Description |
|---|---|
| Font | Allows for changing font settings for the currently select table(s). |
"Output" Tab
| Option | Description |
|---|---|
| Print Preview | Opens a dialog that displays a preview for printing the diagram. |
| Opens the print dialog for printing the diagram. |
"Page Setup" Tab
| Option | Description |
|---|---|
| Orientation | Chooses between Landscape/Portrait orientation of diagram. |
| Size | Chooses paper size for diagram printing/paging. |
Tools Ribbon
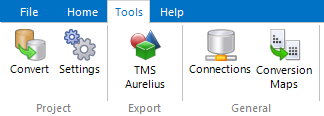
"Project" Tab
| Option | Description |
|---|---|
| Convert | Converts current project into another DBMS. |
| Settings | Shows and allows edits on current project settings. |
"Export" Tab
| Option | Description |
|---|---|
| TMS Aurelius | Opens a dialog to export existing database schema to Aurelius classes. |
"General" Tab
| Option | Description |
|---|---|
| Connections | Shows existing database connections and allows adding, removing or editing them. |
| Conversion Maps | Allows you to create a conversion map with specific data type equivalences to use when converting a project from a DBMS to another. |
Help Ribbon
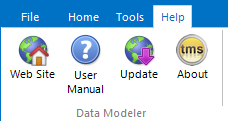
"Data Modeler" Tab
| Option | Description |
|---|---|
| Web Site | Opens TMS website on the standard web browser. |
| User Manual | Opens the user manual as help file. |
| Update | Checks if a new Data Modeler version is available and if true, prompts for updating the software. |
| About | Opens About window. |
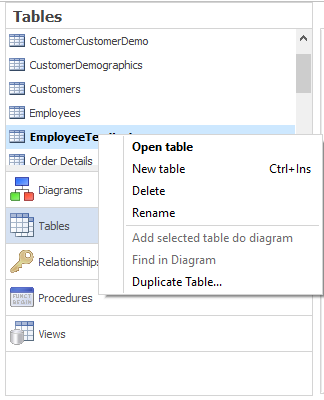
Project Explorer
The project explorer is on the left side of the screen, and lists all items of the project. By clicking any of the data dictionary buttons on the bottom, you will find all objects, such as Tables, Relationships, Procedures, and Diagrams. You can hide it or show it by selecting Project Explorer on the Show/Hide tab on the Home Ribbon.
By double-clicking in any of the available objects, its specific editor will open in the workspace, allowing visualization and editing. If the selected object has already been opened on the workspace, a single click will focus on its existing tab. By right-clicking in any point of the project explorer, a context menu will open with options such as creation of new objects and removal of selected objects
Workspace
The project workspace is the area on the right that organizes the project information into tabs. When double-clicking any object from the project explorer, its specific editor will open on the workspace, on a new tab. After editing, closing any tab will automatically save changes.
Here is a sample view of the Table editor open on the Workspace. Other tabs already open are diagram and relationship editors.

Messages Window
The message window is a text box at the bottom of the application which shows notifications about the project. To enable this tool, select Messages Window on the Show/Hide tab on the Home ribbon. To validate a project and list messages about any problems found, select Check on the Project tab on the Home ribbon.
