Creating Workflow Definitions
One of the main tasks using Workflow Studio is to create workflow definitions that will represent the business process. You create a workflow definition in the workflow definitions dialog.
A workflow definition is basically a workflow diagram where you add diagram objects.
You can also define workflow variables and workflow attachments to be used in the workflow diagram. While building the workflow definition, you can take benefit from expressions and scripts to make it more flexible and adaptable to different situations.
Workflow diagram objects
A diagram object is something that you put inside a workflow diagram. It can be a block which perform a specified operation, a transition, or some special objects that control the execution flow, like connectors and forks.
Start block
![]()
Overview: indicates where the process starts.
Allowed inputs: 0
Allowed outputs: 1
Description:
Only one Start block can exist in a workflow diagram.
End block
![]()
Overview: indicates where the process ends.
Allowed inputs: many
Allowed outputs: 0
Description:
Only one End block can exist in a workflow diagram.
Error block
![]()
Overview: Error block is executed when an error occurs while executing the workflow diagram.
Allowed inputs: 0
Allowed outputs: 1
Description:
Only one Error block can exist in a workflow diagram.
Whenever an error occurs during the execution of the workflow diagram, the execution flow goes to the error block and then follow the path specified by it (the next block after the error block). You can use error block to perform some clean up and then finish the execution of workflow diagram.
Source connector
![]()
Overview: The source connector is a passthrough block to increase readibility of diagram. It makes execution flow to a target connector.
Allowed inputs: many
Allowed outputs: 0
Description:
If the execution flow reaches a source connector, then the diagram jumps
to a target connector that is related to the source connector.
The "relation" between the source and target connector is done by the text inside them. If the text is the same, the connection is established. For example, when the execution reachs a source connector labeled "A", then it jumps to the target connector labeled "A". This way you can have several source-target connections in a single diagram.
Target connector
![]()
Overview: The target connector is a passthrough block to increase readibility of diagram. It receives execution flow from a related source connector.
Allowed inputs: 0
Allowed outputs: 1
Description:
If the execution flow reaches a source connector, then the diagram jumps
to a target connector that is related to the source connector.
The "relation" between the source and target connector is done by the text inside them. If the text is the same, the connection is established. For example, when the execution reachs a source connector labeled "A", then it jumps to the target connector labeled "A". This way you can have several source-target connections in a single diagram.
Transition
![]()
Overview: Connects one block to another, indicating the execution flow of diagram.
Description:
You use a transition (line, or wire) to connect a block to another. The
transition indicates the execution flow, meaning that it flows from the
source block to the target block.
You create a transition by pressing down the mouse button at one link point (blue "x" in blocks) in the source block, dragging the mouse, and releasing the button at one link point in the target block. An arrow indicates the execution flow.
You can create a normal transition, a side transition or an arc transition. All behave the same, the difference is only visual.
You might not be able to attach a transition to a block, depending on the allowed inputs and outputs to the block. For example, if you try to create a transition that targets a Start block, you won't be able to do it, because a Start block does not allow inputs.
Some blocks allow multiple transitions as outputs. In this case, each transition must be labeled so that the diagram knows which transition must be used according to a specified condition. Only one transition is used for leaving a block. So, for example, two transitions might be connected to the output of a Decision block, but one should be labeled "yes" and the other should be labeled "no", so the diagram will know which transition to take according to the result of the decision condition.
You can also specify a script for a transition, so that if the execution goes through the transition, the script is executed. In the transition dialog editor there is a tab named "Script" where you can write the script to be executed.
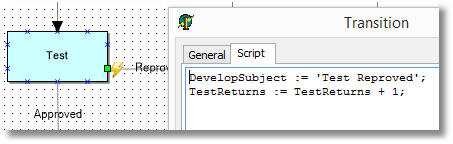
When the transition has a script associated to it, a small lightning bolt icon is displayed at the beginning of the transition line.
Fork object
![]()
Overview: Creates parallel execution paths.
Allowed inputs: many
Allowed outputs: many
Description:
The fork object is used to create parallel execution paths. When a
diagram of a workflow instance is started, there is a single execution
path (started by the Start block). If the
execution reaches a fork block, the flow is split in several parallel
paths (depending on the number of outputs in the fork) the execute
simultaneously.
At the end, all execution paths must finish at the same join object, otherwise the diagram is incorrect. Once all parellel execution paths finish, the main execution path starts again, from the join object.
Join object
![]()
Overview: Ends parallel execution paths created by a fork object.
Allowed inputs: many
Allowed outputs: 1
Description:
The join object is used to end and join parallel execution paths. When a
diagram of a workflow instance is started, there is a single execution
path (started by the Start block). If the
execution reaches a fork block, the flow is split in several parallel
paths (depending on the number of outputs in the fork) the execute
simultaneously.
At the end, all execution paths must finish at the same join object, otherwise the diagram is incorrect. Once all parellel execution paths finish, the main execution path starts again, from the join object.
The main execution path will restart in the join object, going through the next block connected to its output. The main execution path will not restart until all execution paths created by the fork object are finished.
Decision block
![]()
Overview: Changes the execution flow according to a boolean condition.
Allowed inputs: many
Allowed outputs: 2 ("yes" and "no")
Description:
Use a decision block to change the execution flow according to a boolean
condition. When execution flow reaches a decision block, the condition
of the block is evaluated. If it is true, then the execution path goes
through the transition labeled "yes".
If it is false, it goes through the transition labeled "no".
Task block
![]()
Overview: Creates task instances for users based on its task definitions.
Allowed inputs: many
Allowed outputs: many (restricted to status list)
Description:
The task block is one of the more important block types in a diagram.
With task block you can specify task definitions to be created for
users. When the execution flow reachs a task block, it creates task
instances for each task definition.
The task block itself is nothing but a set of task definitions. So, to use the task block, just create one or more task definitions and set the task definition properties.
The workflow execution will stop at the task block until all task instances are finished. A task instance is finished when its status change to a completion status.
After all task instances are finished, the execution flow continues, according to these rules:
Task block has only one output: The execution flow goes through that path.
Task block has two or more outputs: Each output transition must be labeled with the name of a completion status. The execution path goes through the transition which is labeled with the same text as the task block output, which is the completion status of the task instance, i.e., if the task instance was completed as "approved" (a valid completion status, for example), then the execution path goes through the transition labeled "approved".
If more than one task instance was created by the task block, either from the same task definition or from different task definitions, then the task block output will be the most common completion status among the task instances. For example, if two task instances finish as "rejected" and one task instance finishes as "approved", then the task block output will be "rejected" and the execution path will follow the transition labeled the same.
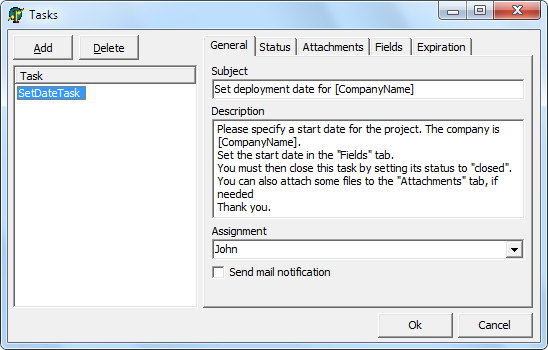
Task definition properties
The task definitions are created in the task definition editor (Tasks dialog) for the Task block. When you double-click a Task block, the dialog is shown.
You can use Add and Delete buttons to add or delete task definitions. The list view at the left of the dialog displays the existing task definitons for the block. The name of task definition is displayed.
Name
Valid identifier that uniquely identifies the task definition. In the
example below, "SetDateTask".
General
Subject
Contains the subject of the task. Used as a summary for e-mail messages
or for the task list. Accepts expressions.
Description
Multi-line description of the task. Here all the instructions about the
task should be inserted. Accepts expressions.
Assignment
The name of the user (or group) that the task instance will be assigned
to. If it is a user, a single task instance will be created and will be
assigned to that user. If it is a group, then the behaviour depends on
the value of TWorkflowStudio.GroupAssignmentMode property:
gamMultipleTasks: This is default value. A task will be created for each user in the group. So, if a group has users "john" and "maria", one task will be created for John, and antoher to Maria, and the tasks will be independent (both will have to be concluded).
gamSingleTask: A single task will be created that will be visible for all users in the group. If you later include/remove users to/from the group, the existing tasks will become not visible for users removed from the group, and will become visible to users added to group. Any user from the group can update the task, including finishing it.
You can override the GroupAssignmentMode settings by using any(groupname) or all(groupname) in assignment. For example, suppose you have a group named "developers".
Filling "developers" in Assignment will either create a task for each member in "developers" group, or will create a single task for any member in the group to handle it. It willl depend on value of GroupAssignmentMode.
Filling "any(developers)" will create a single task for any member in the group to handle (regardless of GroupAssignmentMode).
Filling "all(developers)" will create one task for each member in the group to handle (regardless of GroupAssignmentMode).
Send mail notification
If true (checked), then an e-mail notification
will be sent to the user when the task instance is created.
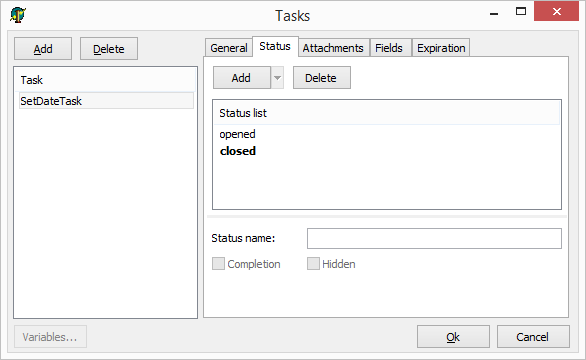
Status
Status list
Contains a list of the valid status for the task.
The initial status of the task will be the first status in the list.
Some status can be marked as completion status, by checking the "Completion" option. When the status of a task instance changes to a completion status, the task is considered finished. You can have more than one status marked as a completion status.
Status with the "Hidden" option checked is a possible status to the task, but will not be displayed in user interface for changing the task status (like in the status combo box).
When a task instance is created, the valid status are displayed in a combo box in the task list dialog, and then user can change the status of a task.
If you have status templates predefined in your application, the user will be able to choose one of the templates by using the down arrow button at the right of the "Add" button.
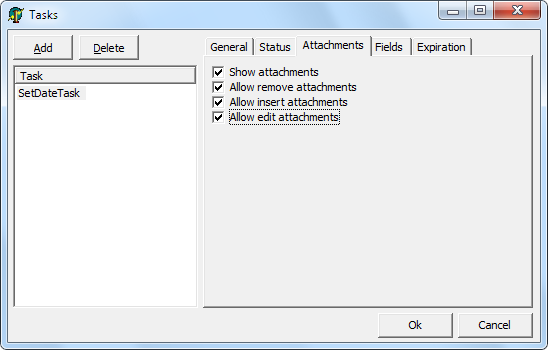
Attachment permissions
Defines the permissions for the users when handling attachments.
Show attachments
Shows the attachments tab in the task list. If false (unchecked), the
user will not be able to do anything related to attachments (add, view,
etc.). If true (checked) the user will be able to, at least, open and
view attachments.
Allow remove attachments
If true (checked), allows the user to remove attachments from the task
instance.
Allow insert attachments
If true (checked), allows the user to insert new attachments to the task
instance.
Allow edit attachments
If true (checked), allows the user to open an existing attachments for
editing, and updating its content.
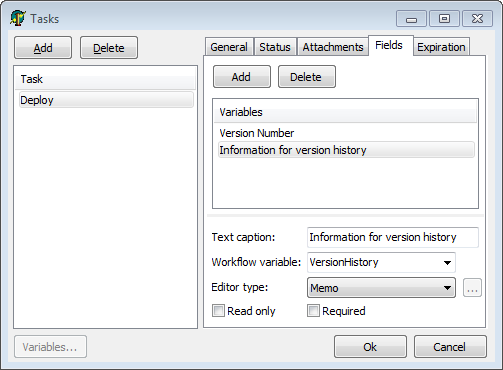
Fields
Defines fields for the task instance. One or more fields can be defined for a task. A field is a placeholder for a value. All task fields are shown when a task instance is being displayed for a user in the task list dialog. Fields can be useful for users to see extra information related to the task, or for users to input valuable information. They add an extra level of flexibility.
A field is always related to a workflow variable, which is the real container for the field value. A field does not have a "value" it just reads/writes values from/to a workflow variable.
Text caption
It is the name of the field which will be displayed for the user.
Workflow variable
The name of the workflow variable related to the field. Fields read the
value from the workflow variable, and write back the value to the
workflow variable, if the user changes the value.
Read only
Mark the field as read-only, so the information is visible but not
editable.
Editor type
Chooses the type of editor control used to edit/view the value of the
variable when the user is editing the task.
Valid values can be:
- Text: edit box for free text editing;
- Check: checkbox for boolean values;
- Date: date picker for date values;
- Memo memo for free multiline text editing;
- DropDown: combobox with a list of items to choose (you can define the items to be displayed in combobox).
Required
When a field is required, the task instance can not be saved (altered)
until a value is filled in the field. So, users cannot add, remove, edit
attachments, or change task status, or change any other information in
the task instance, if the field specified as required is empty.
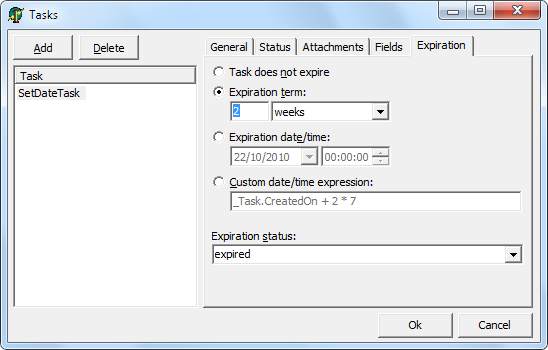
Expiration
Defines the date/time for expiration of a workflow task. If a task has a defined expiration date/time, when it exceeds this date/time without being closed by an user (changed to a completion status), its status is automatically changed to an expiration status. To use this feature check the section Running workflow instances for tasks expiration.
Task does not expire
This is the default option. If checked, the task will never expire, and
will keep assigned to the current user/group until finished (changed to
a completion status).
Expiration term
Check this option to enter an expiration term for the task, and enter
the amount of days, weeks or months (integer or floating point value).
The expiration date will be calculated from the creation date of the
task.
Expiration date/time
Check this option to enter a fixed due date/time for the task.
Custom date/time expression
This option allows to enter a custom expression to evaluate the task
expiration date/time. The expression must return a DateTime value and
may use variables from the current workflow, task properties (is common
to use _Task.CreatedOn property to retrieve the task creation date/time
and calculate the expiration date), as well as all the features allowed in
expressions.
Expiration status
Determines the status to which the task will be automatically changed
after expiring. It must be a completion status.
Approval block
![]()
Overview: It's a special task block which has a single approval task definition.
Allowed inputs: many
Allowed outputs: many (restricted to status list)
Description:
The approval block is just a task block which has a single
task definition. This task
definition is an approval task definition and it's a regular task
definition with the difference that some properties are already
initialized, with the subject, description, and specially the status
list.
The approval task comes with three valid status in status list: "opened", "approved" and "rejected". The approved and rejected status are completion status for the task.
You can change the approval task definition properties as you want, just like in a task block. The only difference to the task block is that you cannot create more than one task in the approval block.
Script block
![]()
Overview: Executes a script code.
Allowed inputs: many
Allowed outputs: one (if the script does not return any value)
or many (depending on possible script results)
Description:
The script block just executes a script code. In most cases, the script
block will have only one output. But you can also use multiple outputs
from script block, it will depend on script result. You can define the
script result by using result variable:
result := 'result1';
If you have more than one output, each leaving transition should have a label, and the execution flow will take the transition which label is the same as the script result. In the example above, you must have a transition labeled "result1" so the execution will follow that path.
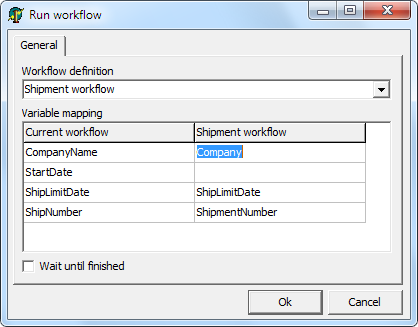
Run workflow block
![]()
Overview: runs a separated workflow instance.
Allowed inputs: many
Allowed outputs: 1
Description:
The run workflow block allows running a new workflow (subworkflow),
separated from the current instance, in a synchronous or asynchronous
way. To exchange information between the workflow instances, a variable
mapping should be specified in the block definition.
If "Wait until finished" flag is checked, the current workflow will wait the subworkflow to finish, in order to continue. The variable mapping is bidiretional in this case.
If "Wait until finished" flag in unchecked, the current workflow will continue execution normally regardless of subworkflow status. Variable mapping is unidirectional only.
The variable mapping lists which variables in the subworkflow will be updated. In the screenshot example below, variable "Company" in Shipment workflow (subworkflow) will receive the value of variable "CompanyName" in the current workflow. In the case of bidirectional mapping, when Shipment workflow finishes, the value of "CompanyName" will be updated again, with the value of variable "Company".
Database SQL Block
![]()
Overview: Run an SQL statement in the database.
Allowed inputs: many
Allowed outputs: 1
Description:
This block allows the you to specify an SQL statement in the database.
You can use expressions in the SQL statement.
Parameters
- SQL Statement: Contains the SQL statement to be executed in the database. Supports expressions. Example:
Update Invoice Set Status = 3 Where InvoiceId = [InvoiceId]
Send Mail Block
![]()
Overview: Sends an e-mail message.
Allowed inputs: many
Allowed outputs: 1
Description:
This block sends an e-mail using the existing
e-mail notification settings.
Parameters
- To: The e-mail address to send the e-mail (recipient).
Supports expressions. Examples:
[UserEmail]john@foo.com
- Cc: E-mail address that will receive a copy of e-mail message (carbon copy). Supports expressions.
- Bcc: E-mail address that will receive a blind carbon copy of e-mail message (blind carbon coby). This means this e-mail address will not be visible to other recipients. Supports expressions.
- Subject: The subject of the e-mail message.
Supports expressions. Example:
Please review invoice #[InvoiceId]
- Message: The content (body) of e-mail. Supports expressions.
Comment Block
![]()
Overview: Shows a comment.
Allowed inputs: none
Allowed outputs: none
Description:
Adds a visual element to the diagram containing a fixed text. This block
doesn't affect the behavior of diagram and is just used for visual
indication. If you want text that supports expressions,
use Text Block.
Text Block
![]()
Overview: Displays a dynamic text in diagram.
Allowed inputs: none
Allowed outputs: none
Description:
Use this block to display a text in any place of the diagram which can
change according to workflow context. The main difference between this
block and Comment block is that it
supports expressions and has no other
visual elements besides the text itself. So you can use it to display
dates, variable values, etc., over or close any other diagram object.
Workflow variables
A workflow variable is a named "slot" in a workflow where you can save information, just like a variable in a program.
You create the variable in the workflow definition, and each workflow instance created from the workflow definition will have a copy of that workflow variable. So, for example, a workflow definition for order processing might have the workflow variable "OrderNo". Once a workflow instance is created, the OrderNo variable will be there, and you can read/write values from/to that variable, and it's valid only for that workflow instance.
To define a workflow variable:
Open the workflow definition editor.
Open the menu option Workflow | Variables...
The variable editor will be displayed.

The variable editor shows a list of defined workflow variables. You can add and delete variables using "Add" and "Delete" buttons.
All you need to do is define a name for the variable (in this example, two variables named "CompanyName" and "StartDate"). Optionally you can define a start value for the variable, in the "Value" edit box.
You can also use the "Description" field to add comments to variable explaining what is it used for (documentation of the variable).
Once a workflow variable is defined you can use them in expressions and scripts.
Attachments
Attachments are a powerful feature that allows each workflow instance to have one or more files associated with it. Users can add, edit or remove attachments (depending on their attachment permissions) while dealing with the tasks.
As an example, a user can attach a file (or a set of files) to a task, and then another task can be created for another user, and this new user can see the file attached by the previous one. Or, users can edit and update attachments along the workflow execution. This makes stronger collaboration between users while a workflow instance is being executed.
An attachment is actually a container for a group of files (attachment items). These "containers" (attachments) can created in the workflow definition, and several attachments can be created. By default a single attachment is always created in the workflow definition, named "Attachments".
To define attachments in a workflow definition:
Open the workflow definition editor.
Open the menu option Workflow | Attachments...
The attachment editor will be displayed.
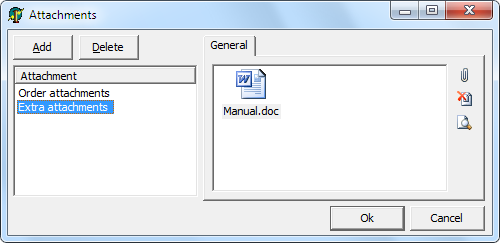
Here you can create several attachments, and name each one. In the example above, two attachments were created: "Order attachments" and "Extra attachments".
Note that you can add attachment items (files) in the attachment in this window. But remember that this is a workflow definition, several workflow instances will be created from this one. If you add a file here, that file will be present in each workflow instance created. So, in general, you only create empty attachments here, and each workflow instance will have its own files in there, if any.
While an attachment is at a workflow instance level and you can manipulate attachments any time, they are strongly related to task instances. When a task instance is created, it is listed in the task list dialog. The attachments are also displayed in that dialog (if the task definition allowed it in the attachment permissions). And then users can add, edit or remove attachments. When the task instance is saved by the user, the files (attachment items) are updated in the attachment and are saved together with the workflow instance.
Expressions
Expressions are a powerful way to customize the workflow definition. You can use expressions in several properties of some blocks, specially in task definition properties of a task block. When the property is about to be used, all expressions in the text are converted to their values. Expressions are identified by brackets "[" and "]". Below are examples of expression usage:
Subject: This is a subject about order number [OrderNo].
Description: Please mr. [UserName], solve this task until date [DateToStr(StartDate + 30)].
In these examples we have three expressions: OrderNo, UserName and
DateToStr(StartDate + 30). Note that expressions use
workflow variables. The value of the
workflow variable is evaluated and used in the expression. As an
example, the result text, after evaluating the expressions, would be:
Subject: This is a subject about order number 1042.
Description: Please mr. Smith, solve this task until date 12-05-2020.
Besides workflow variables, expressions also accept:
- Aritmetic operators
- +, -, /, *, div, mod
- Boolean/logical operators
- and, or, not, xor
- Relational operators
- <>, =, <, >, <=, >=
- Bitwise operators
- shl, shr
- Numeric constants
- 153 (integer), 152.43 (decimal), $AA (hexa)
- String constants
- 'This is a text'
- Char constants
- #13 (return character)
- Delphi-like functions and procedures
- Abs
- AnsiCompareStr
- AnsiCompareText
- AnsiLowerCase
- AnsiUpperCase
- Append
- ArcTan
- Assigned
- AssignFile
- Beep
- Chdir
- Chr
- CloseFile
- CompareStr
- CompareText
- Copy
- Cos
- CreateOleObject
- Date
- DateTimeToStr
- DateToStr
- DayOfWeek
- Dec
- DecodeDate
- DecodeTime
- Delete
- EncodeDate
- EncodeTime
- EOF
- Exp
- FilePos
- FileSize
- FloatToStr
- Format
- FormatDateTime
- FormatFloat
- Frac
- GetActiveOleObject
- High
- Inc
- IncMonth
- InputQuery
- Insert
- Int
- IntToHex
- IntToStr
- IsLeapYear
- IsValidIdent
- Length
- Ln
- Low
- LowerCase
- Now
- Odd
- Ord
- Pos
- Raise
- Random
- ReadLn
- Reset
- Rewrite
- Round
- ShowMessage
- Sin
- Sqr
- Sqrt
- StrToDate
- StrToDateTime
- StrToFloat
- StrToInt
- StrToIntDef
- StrToTime
- Time
- TimeToStr
- Trim
- TrimLeft
- TrimRight
- Trunc
- UpperCase
- VarArrayCreate
- VarArrayHighBound
- VarArrayLowBound
- VarIsNull
- VarToStr
- Write
- WriteLn
Scripts
You can use scripts in Workflow Studio, like in the Script Block, for example.
Scripts are a powerful way to customize your workflow definition. You can do various tasks with a script block that would not be possible to do with other blocks. The default syntax language for script is Pascal. So, you can do almost everything you can do in regular Pascal.
Scripts are also a way to manipulate workflow variables. In scripts they are just regular variables. For example, if you have defined a workflow variable named "TotalAmount", you can read the variable value using this code:
//Calculate comission for the sale
Comission := TotalAmount * 0.2;
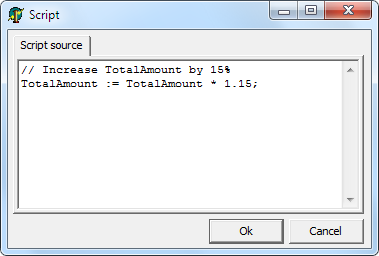
and also change the variable value using this code:
//Increase TotalAmount by 15%
TotalAmount := TotalAmount * 1.15;
Avoid to use message boxes and other dialogs or windows that requires user interaction for the script to continue, this might cause problems. Keep in mind that the workflow is running in background in a thread, and all actions performed by the workflow should be silent and smooth. If you need user interaction you often need to use a task block to create a task for the user.
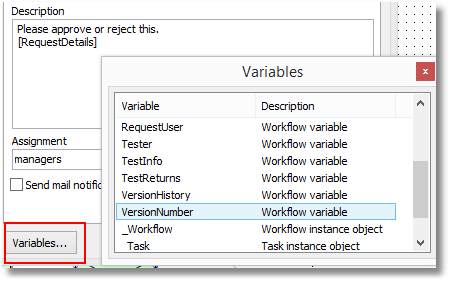
Variables Dialog
When visually creating a workflow definition, you will use dialogs to edit the properties of several different blocks. Each of those blocks might have parameters that accept expressions.
In every dialog that has parameters supporting expressions you will find a button named "Variables..." which opens the Variables Dialog. This dialog shows all the variables that can be used in expressions, and allows you to drag and drop a specified variable to the parameter control. This will create an expression with the variable name in the control.