iOS Tutorial
Overview
In this tutorial we will create a small xls/x document viewer. The app isn't particularly useful or flashy, but it is designed to show most concepts you need to know in order to work with files in iOS
Note
The complete source for this tutorial is available as the demo FlexView in the FlexCel distribution.
Step 1. Setting up the Application
Lets start by creating a new iOS app:

In the dialog that appears:

- Type ios in the search box (1)
- Select iOS Application (2)
- Press Next (3)
In the next screen, we will name our app:
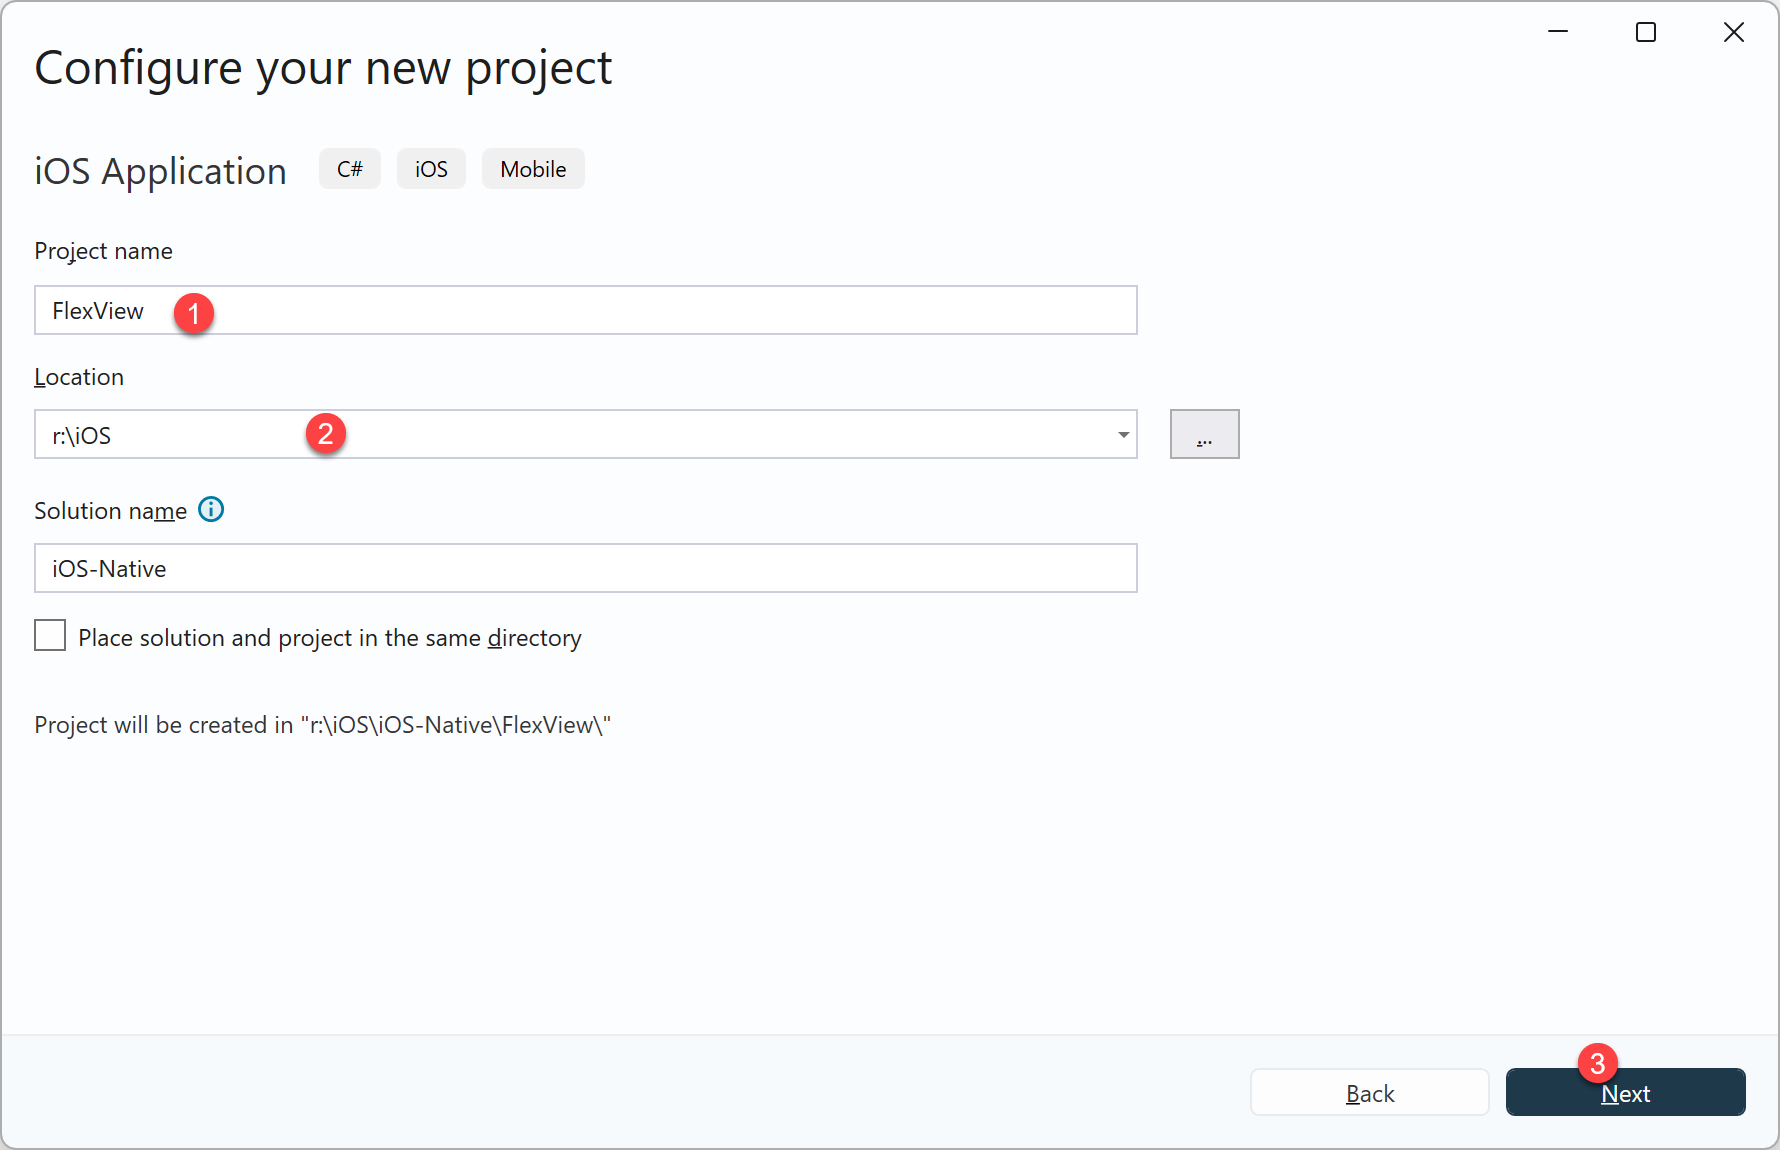
- In this tutorial we will use FlexView (1)
- Select a folder where to save it (2), and press Next (3)
And finally, in the last screen:
- Select an ID for the app (1) and make it universal (2)
Then you can go to the application properties, and set icons and the application name.
You might now try running the application, it should show as an empty form in the simulator or the device.
Step 2. Creating the User Interface
We want to display an Excel file into our application. For this, we will convert the file to pdf using FlexCel, and show the pdf output in a web browser. As this is a native iOS application, not a MAUI one, editing the UI means editing storyboards, which you have to do in XCode.
Note
It used to be the case that you could edit the storyboards directly in Visual Studio, but that is not the case anymore. At the time of this writing, you need to edit them in a mac with XCode, and use this xcsync tool to sync the changes back and forth.
Other options include using Jetbrain's Rider on the mac, or Visual Studio Code with an extension for editing storyboards. Or not to use storyboards at all and do it all by code.
In this tutorial we are going to use xcsync. So in case you don't have it, the first step is to install it, in the mac:
dotnet tool install --global dotnet-xcsync --prerelease
You can find a more complete guide here: https://github.com/dotnet/xcsync/blob/main/docs/using-latest-daily.md Now, let's copy the project to the mac, and type
xcsync generate -f
This will generate the file FlexView/obj/xcode/FlexView.xcodeproj. Double click it to open it in XCode.
Go to File->New->File from Template And create a new Storyboard. We will call it "Main.storyboard"
In the designer, drop a WebKit View and a Toolbar. Adjust the anchors so the WebKitView resizes with the window.

Name the WebView "Viewer".
Create an Outlet for the WebView also named “Viewer” by ctrl-dragging the WebView to the assistant view.
Now save the project and run
xcsync sync
To import the storyboard back in your project. You should have a new "Main.Storyboard" file. We need to hook it to the app, and remove the code that prints a "Hello iOS" message. For that, we will add the lines:
	<key>UIMainStoryboardFile</key>
	<string>Main</string>
in Info.plist, after the line:
<string>LaunchScreen</string>
Also, remove the code in the method public void WillConnect as it is not needed anymore. We will use storyboards instead.
Finally, we need to connect the outlet we created with a .NET class. So we should create a new file, WebViewer.cs and write the following inside: `
using ObjCRuntime;
using WebKit;

namespace FlexView
{
    [Register("WebViewer")]
    public partial class WebViewer(NativeHandle handle) : UIViewController(handle)
    {
        [Outlet]
        public WKWebView Viewer { get; set; } = null!;

        public override void ViewDidLoad()
        {
            base.ViewDidLoad();
        }
    }
}
Note
In this tutorial we went through the manual and painful way, because the idea is to teach you how it is done. When you have to do it, asking an AI agent to add the components and set everything will likely be simpler. With luck, in future editions, the process will also get simpler. The current process is convoluted, but no matter how you get to this point, the parts that concern FlexCel start below.
Step 3. Registering the application
The next step is to tell iOS that our application can handle xls and xlsx files. This way, when another app like for example mail wants to share an xls or xlsx file, our application will show in the list of available options:

To register our app, we need to change the file Info.plist.
This can be done directly from XCode, but for this example we’ll just open the new generated Info.plist with a text editor, and paste the following text before the last </dict> entry:
	<key>CFBundleDocumentTypes</key>
	<array>
		<dict>
			<key>CFBundleTypeName</key>
			<string>Excel document</string>
			<key>CFBundleTypeRole</key>
			<string>Editor</string>
			<key>LSHandlerRank</key>
			<string>Owner</string>
			<key>LSItemContentTypes</key>
			<array>
				<string>com.microsoft.excel.xls</string>
				<string>org.openxmlformats.spreadsheetml.sheet</string>
				<string>com.tms.flexcel.xlsx</string>
				<string>com.tms.flexcel.xlsm</string>
			</array>
		</dict>
	</array>


	<key>LSSupportsOpeningDocumentsInPlace</key>
	<true/>
	<key>UIFileSharingEnabled</key>
	<true/>

	<key>UTExportedTypeDeclarations</key>
	<array>
		<dict>
			<key>UTTypeDescription</key>
			<string>Excel xlsx document</string>
			<key>UTTypeTagSpecification</key>
			<dict>
				<key>public.filename-extension</key>
				<string>xlsx</string>
				<key>public.mime-type</key>
				<string>application/vnd.openxmlformats-officedocument.spreadsheetml.sheet</string>
			</dict>
			<key>UTTypeConformsTo</key>
			<array>
				<string>public.data</string>
			</array>
			<key>UTTypeIdentifier</key>
			<string>com.tms.flexcel.xlsx</string>
		</dict>
		<dict>
			<key>UTTypeDescription</key>
			<string>Excel xlsm document</string>
			<key>UTTypeTagSpecification</key>
			<dict>
				<key>public.filename-extension</key>
				<string>xlsm</string>
				<key>public.mime-type</key>
				<string>application/vnd.ms-excel.sheet.macroEnabled.12</string>
			</dict>
			<key>UTTypeConformsTo</key>
			<array>
				<string>public.data</string>
			</array>
			<key>UTTypeIdentifier</key>
			<string>com.tms.flexcel.xlsm</string>
		</dict>
	</array>
Once you have done this, if you run the application and have for example an email with an xls or xlsx file, you should see “FlexView” in the list of possible applications where to send the file when you press "Share". You should also be able to the "Files" application in iOS, and either share or "Open With" FlexCelView.
Step 4. Reading the file sent by another application
If you tried the application after the last step, and pressed the “Open in FlexView” button, you will notice that FlexView starts, but the previewer is still empty. It won’t show the file that the other application sent.
What happens when you press the “Open in FlexView” button is that iOS will copy the file in the “Documents/Inbox” private folder of FlexView, and send an OpenURL event to our app. We need to handle this event, and use it to load the file in the preview.
Open AppDelegate.cs in Visual Studio, and write the following code:
public override bool OpenUrl(UIApplication application, NSUrl url,
    string sourceApplication, NSObject annotation)
{
      return FlexViewViewController.Open(url);
}
Tip
You might just write “override” inside the AppDelegate class, and Visual Studio will show you a list of possible methods to override.
Note
In iOS, we are going to get the URL of the file, not the filename. For example, the URL could be:
'file://localhost/private/var/mobile/Applications/9D16227A-CB01-465D-B8F4-AC43D70C8461/Documents/Inbox/test.xlsx'
And the actual filename would be: ‘/private/var/mobile/Applications/9D16227A-CB01-465D-B8F4-AC43D70C8461/Documents/Inbox/test.xlsx’
But while iOS methods can normally use an URL or a path, C# FileStream expects a path. This is why we need to convert the URL to a path, using the url.Path.
So now it is the time to do the actual work. We need to write the Open(url) method, that will convert the file to pdf and display it on the browser.
Note
For this to work, you also need to add a nuget reference to TMS.FlexCel
For this, open the file WebViewer.cs, and write the following uses at the start:
using FlexCel.Render;
using FlexCel.XlsAdapter;
And then type the following code inside the class:
        NSUrl? XlsUrl;
        string? PdfPath;

        public bool Open(NSUrl url)
        {
            XlsUrl = url;
            return Refresh();
        }
        private bool Refresh()
        {
            try
            {
                if (XlsUrl == null) throw new Exception("No url provided");
                XlsFile xls = new XlsFile(XlsUrl.Path);
                PdfPath = Path.Combine(Environment.GetFolderPath(Environment.SpecialFolder.InternetCache), Path.ChangeExtension(Path.GetFileName(XlsUrl.Path), ".pdf")!);

                using (FlexCelPdfExport pdf
                             = new FlexCelPdfExport(xls, true))
                {
                    using (FileStream fs = new FileStream(PdfPath,
                           FileMode.Create))
                    {
                        pdf.Export(fs);
                    }
                }
                Viewer.LoadRequest(new
                    NSUrlRequest(NSUrl.FromFilename(PdfPath)));
            }
            catch (Exception ex)
            {
                Viewer.LoadHtmlString("<html>Error opening " +
                    System.Security.SecurityElement.Escape(
                        Path.GetFileName(XlsUrl?.Path))
                    + "<br><br>"
                    + System.Security.SecurityElement.Escape(
                       ex.Message)
                    + "</html>", new NSUrl(""));

                return false;
            }
            return true;
        }
    }
Finally, what is left is to call this method when a url is shared with us. For that, you need to change the WillConnect, DidBecomeActive and OpenUrlContexts methods in SceneDelegate.cs:
       public void WillConnect(UIScene scene, UISceneSession session, UISceneConnectionOptions connectionOptions)
        {
            // The storyboard is configured in Info.plist (UISceneStoryboardFile),
            // so the system automatically creates the window and sets the root view controller
            // from Main.storyboard's initial view controller.

            // Handle URL if the app was launched by opening a file
            var urlContext = connectionOptions.UrlContexts?.AnyObject as UIOpenUrlContext;
            if (urlContext != null)
            {
                pendingUrl = urlContext.Url;
            }
        }

        NSUrl? pendingUrl;

        [Export("sceneDidBecomeActive:")]
        public void DidBecomeActive(UIScene scene)
        {
            // Process any pending URL once the view is fully loaded
            if (pendingUrl != null && Window?.RootViewController is WebViewer webViewer)
            {
                webViewer.Open(pendingUrl);
                pendingUrl = null;
            }
        }

        [Export("scene:openURLContexts:")]
        public void OpenUrlContexts(UIScene scene, NSSet<UIOpenUrlContext> urlContexts)
        {
            // Called when a file is opened while the app is already running
            var urlContext = urlContexts?.AnyObject as UIOpenUrlContext;
            if (urlContext != null && Window?.RootViewController is WebViewer webViewer)
            {
                webViewer.Open(urlContext.Url);
            }
        }
If you run the application now and press “Open in FlexView” from another application, FlexView should start and display the file. You should be able to scroll and pinch to zoom.
Notes on temporary files and memory usage
Normally when coding for a PC, you want to avoid temporary files. In the code above, we could have directly exported the xls file to a memory stream, and then use that memory stream to create an NSData object and load it directly to the web browser.
But when coding for a phone, things are different. In this case, the memory of the device is limited, and the flash storage is fast and huge (it has to be able to store music and videos).
So, if memory is our constraint, it makes more sense to create a temporary file and read from there. While FlexCel will keep the spreadsheet in memory when opening, it won’t keep the pdf file, which is generated on the fly. So saving this pdf file to a temp place can reduce the memory usage a lot.
Another thing to notice is that we should not write this temporary file to the /Documents folder, because this isn’t user data, and it shouldn’t be backed up by iOS. That’s why we write it to Library/Caches
And the last thing we are missing here, is to remove the file once the WebView loaded it. While this isn’t strictly necessary (iOS will remove files in this cache when it needs space), it is a good practice.
We could remove the file in the Viewer.LoadFinished event, but since we plan to share the file with other apps in the next steps, we will keep it longer. So we will delete the old file before writing a new one.
In WebViewer.cs, add the following method:
       private void RemoveOldPdf()
        {
            if (PdfPath != null)
            {
                try
                {
                    File.Delete(PdfPath);
                }
                catch
                {
                    //do nothing, this was just a
                    //cache that will get deleted anyway.
                }
                PdfPath = null;
            }
        }
And call RemoveOldPdf() as the first line in the Refresh() method we wrote above. Note that we could have also saved always to the same filename, so we wouldn’t need to worry about deleting files at all. But when sharing the file, the filename would be lost.
Note
While we won’t cover this here, another advantage of using a temporary file is that if your app gets killed by the OS, you can restore the state from the temporary file when restarted.
Step 5. Modifying the file
For this step, we will be replacing all numbers in the file with random numbers and recalculating the file. While this doesn’t make a lot of sense, it shows how you can modify a file.
In this particular case, the only difficulty is that we can’t overwrite the original file at Documents/Inbox. It is read-only. So we will save it to the Caches folder as tmpFlexCel.xls or tmpFlexCel.xlsx depending on the file format.
Saving it with the same name allows us to not care about deleting the temporary file because it will always be the same. But on the other hand, we need to store the original name of the file so the generated pdf file has the right filename.
So we’ll introduce a new variable:
string? XlsPath;
We will set it to XlsUrl.Path in the Open method, and we’ll replace the old XlsUrl.Path for XlsPath in all places where it isn’t dealing with the pdf file.
Finally, we’ll add a button and write this on the event handler:
Note
To avoid complexity in this tutorial, we won't cover how to add a button and its event, but you might need to go back to XCode and add them. But you can also ask an agentic AI to do it for you, and it works well.
public void RandomizeTapped(NSObject sender)
{
    if (XlsUrl == null || XlsPath == null) return;

    XlsFile xls = new XlsFile(XlsPath, true);
    //We'll go through all the numeric cells and make them random
    Random rnd = new Random();

    for (int row = 1; row <= xls.RowCount; row++)
    {
        for (int colIndex = 1;
             colIndex < xls.ColCountInRow(row);
             colIndex++)
        {
            int XF = -1;
            object val = xls.GetCellValueIndexed(row, colIndex, ref XF);
            if (val is double) xls.SetCellValue(row,
			          xls.ColFromIndex(row, colIndex), rnd.Next());
        }
    }

    //We can't save to the original file, we don't have permissions.
    XlsPath = Path.Combine(
        Environment.GetFolderPath(
		Environment.SpecialFolder.InternetCache),
        "tmpFlexCel" + Path.GetExtension(XlsUrl.Path));

    xls.Save(XlsPath);
    Refresh();
}
This code should do the replacement.
Step 6. Sending the file to other applications
In step 4 we saw how to import a file from another application. In this step we are going to see how to do the opposite: How to export the file and make it available to other applications that handle xls or xlsx files. We will also see how to print the file.
Luckily, this isn’t complex to do.
Go to the UI designer, locate the “item” button in the toolbar, rename it “Share”, and add the following code in the button event handler:
partial void ShareClick(MonoTouch.UIKit.UIBarButtonItem sender)
{
          if (PdfPath == null) return;
          UIDocumentInteractionController docController = new();
          docController.Url = NSUrl.FromFilename(PdfPath);
          docController.PresentOpenInMenu((UIBarButtonItem)sender, true);
}
This should show a dialog in your app to share the file with other apps. And it might be what we want in many cases. But this dialog doesn’t include the options to “Print”, or “Mail”, which might be interesting to show too.
To show the extended options, change the last line in the code above from PresentOpenInMenu to PresentOptionsMenu:
docController.PresentOptionsMenu((UIBarButtonItem)sender, true);
Note
Exporting to pdf will show a “Print” option when sharing the file, allowing us to print it.
Step 7. Final touches
In this small tutorial we’ve gone from zero to a fully working Excel preview / pdf converter application. But for simplicity, we’ve conveniently “forgotten” about an interesting fact: Excel files can have more than one sheet.
Modifying the app so it allows you to change sheets isn’t complex, on the FlexCel side you just need to use ExcelFile.SheetCount and ExcelFile.GetSheetName(sheetIndex) to get an array of the sheets, then use ExcelFile.ActiveSheetByName to set the sheet you want to display.
But while not complex, there is a lot of plumbing needed for that: we need to define a new view in the storyboard, we need to populate a table view with the items, and select the correct one when the user selects a new sheet. Sadly this is a lot of code, and would mean making this tutorial twice as big with little FlexCel code and a lot of UI code that you can get tutorials everywhere, and so we won’t be showing how to do it here. It would make the tutorial much more complex and add very little to it.