Current value and set-point
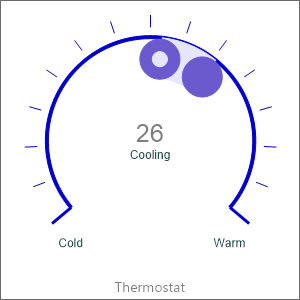
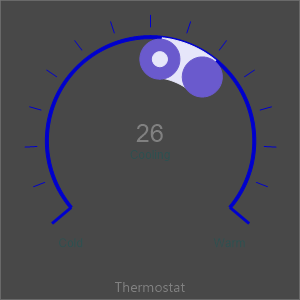
TTMSFNCWidgetSetPoint is a circular indicator that shows two related numbers
on the same scale: the live current value and a target set-point. It is
built for thermostat-style controls and process dashboards where an operator
needs to see, at a glance, the measured reading against the value it is supposed
to reach. The arc between the two markers is filled with a strip so the gap
between where you are and where you want to be is immediately visible. Both
numbers are scaled into the range you declare on ValueOptions, so you work in
your own units (°C, bar, RPM) rather than in percentages. Reach for this widget
instead of a plain gauge when there is a deliberate target to compare against;
reach for TTMSFNCWidgetGauge when you only need to show one reading on a dial.
Define the range and create the widget
The operating range, step increment, display font, and number format live on the
ValueOptions sub-object — not on the control directly. Set
ValueOptions.Min and ValueOptions.Max first: both Value and SetPoint are
silently rejected if they fall outside that range. ValueOptions.Format is a
standard Delphi format string (%g by default) applied to the value shown in the
center of the ring.
procedure TForm1.FormCreate(Sender: TObject);
var
  SetPoint: TTMSFNCWidgetSetPoint;
begin
  SetPoint := TTMSFNCWidgetSetPoint.Create(Self);
  SetPoint.Parent := Self;
  SetPoint.SetBounds(20, 20, 280, 280);

  { Define the operating range and number format on ValueOptions. }
  SetPoint.ValueOptions.Min := 10;
  SetPoint.ValueOptions.Max := 50;
  SetPoint.ValueOptions.Step := 0.5;
  SetPoint.ValueOptions.Format := '%.1f';

  { Caption above or below the ring. }
  SetPoint.CaptionOptions.Text := 'Thermostat';

  { Target value (the set-point marker) and the live current value. }
  SetPoint.SetPoint := 21;
  SetPoint.Value := 24;
end;

procedure TForm1.ApplyReading(ATemperature: Single);
begin
  { Update the live value from a timer or data source. }
  TMSFNCWidgetSetPoint1.Value := ATemperature;

  { Annotate the center based on how value compares to the set-point. }
  if TMSFNCWidgetSetPoint1.SetPoint > ATemperature then
    TMSFNCWidgetSetPoint1.Tickmarks.CenterText := 'Heating'
  else if TMSFNCWidgetSetPoint1.SetPoint < ATemperature then
    TMSFNCWidgetSetPoint1.Tickmarks.CenterText := 'Cooling'
  else
    TMSFNCWidgetSetPoint1.Tickmarks.CenterText := 'OK';
end;
Update the live value
Value is the current reading. It is meant to be driven from code — a timer, a
sensor poll, or a data-binding source — and updating it repaints the ring and
moves the value indicator. There is no built-in editor or drag interaction on
this widget, so a user does not move either marker by hand; you assign both
Value and SetPoint programmatically. Tickmarks.CenterText is a convenient
place to annotate the comparison (for example Heating / Cooling / OK), as
the ApplyReading routine in the snippet above shows.
Two helpers nudge the value by the configured step: StepIt adds one
ValueOptions.Step, and StepBy(AValue) adds an explicit amount. Both clamp at
ValueOptions.Max.
Set the target
SetPoint is the target marker. Assign it whenever the user picks a new target
(for example from an editor elsewhere on the form) or when you restore a saved
configuration:
{ Apply a target chosen elsewhere on the form, e.g. from an edit box: }
TMSFNCWidgetSetPoint1.SetPoint := StrToFloat(EditTarget.Text);
The strip between Value and SetPoint is drawn automatically from whichever
marker is lower to whichever is higher, so the order in which you assign the two
does not matter.
Pitfalls
- Range lives on
ValueOptions, not the control. There is noMin/Maxproperty onTTMSFNCWidgetSetPointitself — useValueOptions.Min/ValueOptions.Max. Setting aValueorSetPointoutside the range is a no-op (the assignment is silently ignored), which usually means the marker "won't move" because the range was never widened. - Set the range before the values. If
Min/Maxstill hold their defaults (0..100) when you assignValue, an out-of-range reading is dropped. ConfigureValueOptionsfirst, then assignValueandSetPoint. - No user interaction. This widget does not let the end user drag a marker;
there is no
Interactiveproperty and no set-point-changed event. Drive both markers from code.
See also
- Appearance and custom drawing — style the indicators, the strip, tick marks, and add overlays.
TTMSFNCWidgetSetPoint— full class reference.TTMSFNCValueOptions— range, step, font, and format.