Versioning
Since version 3.0, SmartSetup allows you to install specific versions of components, not just the latest. Versions are handled differently depending on whether you are installing products from a server (currently all tms products) or from Git repositories.
- For products on a server, the available versions are the ones uploaded to the server.
- For products in a Git repository, the available versions can be either:
- Any tag in the repo. If the repo has a tag
v2.0-beta, you can restore the version "v2.0-beta" - Any branch in the repo. You can also use a branch name as a version name, and SmartSetup will switch to that branch and get the latest commit in it.
- Any git commit ID. You can use any commit ID in the repo as a version. For example, you could use version
df7ab01b9a1a589248d9165e661088f43c0e7075
- Any tag in the repo. If the repo has a tag
Note
For git repositories, anything that you can write in git checkout can be used as a version id.
Finding the available versions of a component.
In the command line, you can do this with the versions-remote command
tms versions-remote
If working with tmsgui, you can right-click any component, choose Install version, and see the versions available.
Note
For git repositories, versions-remote and tmsgui will only report the tags. Reporting every commit ID would make the output useless, but you can still use any commit ID to restore a version.
Rolling back a version
If working from the command line, you can restore a version with tms install product.id:version, where version is any version number returned by versions-remote.
To go back to the latest version, just write tms install product.id without specifying a version.
If working with tmsgui, you can install a specific version by right-clicking on any product, as shown in the Gui usage guide.
Important
When dealing with dependencies, SmartSetup will choose the latest ones unless you specify them explicitly. For example:
tms install tms.biz.aurelius:1.1
Will install Aurelius 1.1, but also the latest version of tms.biz.core (tms.biz.aurelius requires tms.biz.core, so tms.biz.core is installed automatically). This will probably lead to incompatibility issues, since version 1.1 of Aurelius wasn't designed to work with the latest tms.biz.core.
To correctly install Aurelius and Core to some previous version, you would need to do:
tms install tms.biz.aurelius:1.1 tms.biz.core:1.1
But you can see how this can easily get unmanageable. To revert an ecosystem of components to a previous state, you will likely want to use the snapshots we cover below.
Version Pinning
If you have some components that you don't want to update while updating the rest, you can use the tms pin command. You can also pin them by right-clicking on the component in tmsgui.
A pin on a component ensures that it won't be updated if you do a tms update or even if you manually try to do tms install component:some_other_version.
Note
You can of course also pin all the components in smartsetup, by doing:
tms pin *
from the command line. This will give extra security that those components won't be updated no matter what, until you unpin them.
Snapshots
In many cases, you will have a set of components with specific versions that you want everyone on your team to use, or to use on your Continuous integration server. For that use, SmartSetup provides snapshots, which are equivalent to package-lock.json in npm or packages.lock.json in nuget.
Creating a snapshot
A snapshot can be created in two ways:
- Manually, by issuing a tms snapshot command.
- Automatically, by editing the configuration file or by writing
tms config-write -p:"tms smart setup options:auto snapshot filenames = [tms.snapshot.yaml]"
Use the manual approach if you want to retain control of when the snapshots are updated. When you update your components to their newer versions, you take a new snapshot. Use the automatic snapshot method so the snapshot is always updated when you update components, and so you can't forget to do it manually. When automatic, the snapshot will always reflect what you have installed.
Tip
Having the snapshot be created automatically and versioned with your app will allow you to easily "travel back in time" with your project, including all its dependencies. Say you find a bug that didn't happen a year ago. You can roll back in your version control to the version from a year ago, but the components installed will remain at the versions they have today.
If you have an automatic snapshot versioned with your product, you can restore all the components to the versions they were at a year ago, along with your project.
The only issue is that Delphi has a single set of installed components, which can be shared by many projects. To ensure you can roll back your project to its state a year ago, you need to store the snapshot in every one of the repositories for every one of the projects. For this reason, the "auto snapshot filenames" in the configuration file allows an array of filenames, so you can save the snapshot to all your projects. An alternative is to version-control your snapshot file in a separate repository from your projects, but this will make it more complex to roll back a specific project to a given state.
Restoring a snapshot
You restore an existing snapshot with tms restore. This will install all the components in the snapshot, optionally also restoring their versions.
Tip
When restoring, you always need to specify -auto-register or -skip-register, so SmartSetup knows if it should only restore the components or also register them in the IDE. As snapshot/restore is frequently used in Continuous Integration servers, and you don't want to install any components in a server, we make sure that you are explicit about if you want to register the components or not.
Important
By default, tms restore snapshot.yaml -autoregister will restore the list of components in the snapshot to their saved versions. If you also want to restore the components, but update them all to the latest version, you can do so with -latest, as in tms restore snapshot.yaml -latest -autoregister.
Advanced: Multiple versions for different projects
Sometimes, you might want to use different versions of components for different projects. Say Project A is developed and tested against MyAwesomeComponent:v1.0, but for your other projects, you want to use MyAwesomeComponent:latest.
Delphi doesn't make this easy. While in other environments components and their versions are part of the project, in Delphi the components are part of the IDE. If you install MyAwesomeComponent:latest in the IDE to develop Project B, then when you want to work on Project A, you need to uninstall MyAwesomeComponent:latest and install MyAwesomeComponent:v1.0. And reverse the process when you go back to Project B.
Given those restrictions, we recommend that you try to move all your projects to the same set of component versions. If that is not possible, try to reduce the number of versions your projects require. Having every project depend on a different version of a component is not just a problem on its own; it also doesn't work well with Delphi.
Once you have reduced it to a minimum, for the versions you still need, there are the following possibilities:
Virtual Machines
This is in a way the simplest one: Have different virtual machines for each set of component versions your applications require.
- (+) It is simple and isolated. Project B will never change the components Project A uses.
- (-) It might require a lot of Virtual Machines, each one with its own license of Windows.
Different RAD Studio versions
This is not a solution that scales, but there are developers who use different versions of Delphi for different projects. So Projects A, B, and C, which need MyAwesomeComponent:1.0, stay in Delphi 12 (which is where they were originally developed). Delphi 13 has MyAwesomeComponent:2.0, and the newer projects are developed with that.
- (+) It is simple. MyAwesomeComponent:1.0 probably doesn't support Delphi 13 anyway.
- (-) It doesn't scale well. You have only so many Delphi versions.
- (-) It doesn't let you update your projects to the latest IDE without updating the components too.
Installing and Uninstalling
You might just keep a set of snapshots for the different projects, and when you want to work on Project A, you restore the snapshot for Project A (which has MyAwesomeComponent:1.0); before starting on Project B, you restore the snapshot for Project B.
- (+) Scales up to a unique set of components per project.
- (-) You need to manually remember to restore the correct snapshot every time you start working on a different project. This might be error-prone, unless you automate it with some tool.
- (-) If you switch a lot between projects with different component sets, it might be slow. SmartSetup makes it very fast and easy to install and uninstall components, but there might still be some waiting involved.
Registering and Unregistering
Similar to the previous option, but instead of uninstalling and installing every time, you keep multiple folders and register (tms build) and unregister (tms build -unregister) the needed ones. Say, for example, that you have this folder structure:
c:\tms
├───Project1
├───Project2
└───Project3
Where each one of the ProjectN folders has a different SmartSetup installation, with different components and versions. And you have a script that does something like:
param(
    [Parameter(Mandatory = $true)]
    [string]$ProjectName
)

$scriptDir = Split-Path -Parent $MyInvocation.MyCommand.Path
$folders = Get-ChildItem -Path $scriptDir -Directory

if (-not ($folders.Name -contains $ProjectName)) {
    Write-Error "Folder '$ProjectName' not found in $scriptDir"
    exit 1
}

foreach ($folder in $folders) {
    if ($folder.Name -eq $ProjectName) { continue }
    Push-Location $folder.FullName
    tms build -unregister
    Pop-Location
}

Push-Location (Join-Path $scriptDir $ProjectName)
tms build
Pop-Location
And you call it from powershell as:
.\build.ps1 -ProjectName "Project2"
It will unregister all the other components, and register Project2.
- (+) Different from the previous method, it is really fast.
- (+) Similar to the previous method, it scales well. You can have a set of components per project should you decide to.
- (-) You need to remember to run the script before starting Delphi for your project.
- (-) It might make it more difficult to run two different Delphi versions at the same time with different component sets. We say "more difficult" because it would actually work: when you start the first instance it will read the library paths from Project1, and when you launch the second it will read from Project2, but the first IDE instance will stay at the config for Project1. Still, it is not a nice thing to change Delphi's configuration behind its back, and it might bring unexpected issues.
Using the Registry
A final option you have is to install the components in a different Registry branch, and start Delphi with bds /r:registry branch. This allows you to have as many different Delphi installs as you want for different projects, without the overhead of a virtual machine.
The idea is to keep one SmartSetup install per "profile" you need, each one installing to its own registry branch. For example:
%%{init: {"flowchart": {"nodeSpacing": 25, "rankSpacing": 35}}}%%
graph LR
    Root["c:\tms"] --> Dev["Development/<br/>tms.config.yaml<br/>alternate registry key: Development"]
    Root --> Test["Test/<br/>tms.config.yaml<br/>alternate registry key: Test"]
    Root --> Old["OldProject/<br/>tms.config.yaml<br/>alternate registry key: OldProject"]

    Dev -. "bds.exe /r:Development" .-> DevIDE["Delphi (Development)<br/>latest components"]
    Test -. "bds.exe /r:Test" .-> TestIDE["Delphi (Test)<br/>release-candidate components"]
    Old -. "bds.exe /r:OldProject" .-> OldIDE["Delphi (OldProject)<br/>MyAwesomeComponent 1.0"]
Each folder under c:\tms contains its own independent SmartSetup install — its own tms.config.yaml, its own set of components and versions, its own snapshot — and each one registers into a different Delphi registry branch. Set that up in each folder with:
tms config-write -p:"tms smart setup options:alternate registry key=Development"
(replacing Development with the profile name for that folder).
From that point on, the Delphi instance you launch is what decides which profile you are working with. To develop OldProject, you start Delphi with bds.exe /r:OldProject and it will see exactly the components installed in c:\tms\OldProject. Launch another Delphi at the same time with bds.exe /r:Test and you will get a second IDE running side-by-side with the components installed in c:\tms\Test, with no interference between the two. You don't need to register or unregister anything when you switch — each Delphi just reads from its own registry branch.
Tip
Give each profile a distinct editor theme so you can tell at a glance which Delphi window is which.
- (+) Scales very well; you can define as many Delphi configurations as you want or need. You might even configure each Delphi version differently, for example using a different theme, so it is instantly clear what version you are using.
- (+) No overhead. You have a single Delphi installed in a single OS.
- (+) You can have different Delphi instances with different component versions running at the same time, with zero issues.
- (-) Some components not in Smart Setup might not allow you to install them in an alternate registry key. As long as you stay in the Smart Setup ecosystem there should be no problems, but if you try to install other third parties with different setups, they might not play well with installing in a different registry key.
- (-) The Windows Path might be a problem. See the
Importantsection below.
Important
While you can install components in a different registry key, the Windows PATH is only one. So if you are building with packages, and have different versions of the same bpls in different parts of the PATH, you might end up loading the wrong ones.
SmartSetup does the following:
- When installing in the main registry branch, it will modify the Windows Path. So the bpls in the Path will be the ones in the main registry branch.
- When installing in an alternate registry key, it will not change the Path, but will modify the Delphi Environment variables, and add its path there. So when you open Delphi in the alternate registry entry, it will have the alternate path. The apps you launch from Delphi will also inherit that path. Even if you "Start without debugging".
The only problem is, if you are building with runtime packages, and you start your app completely from outside the IDE, it will always use the bpls in the main registry branch. This will normally not be a problem, but if it is, then using the registry might not be an option.
We provide a tool, MultIDE, that makes it simpler to manage multiple Delphi instances in different registry keys. You pin it to the task bar, and you can easily start different Delphi environments in different registry keys, just by selecting from a list.
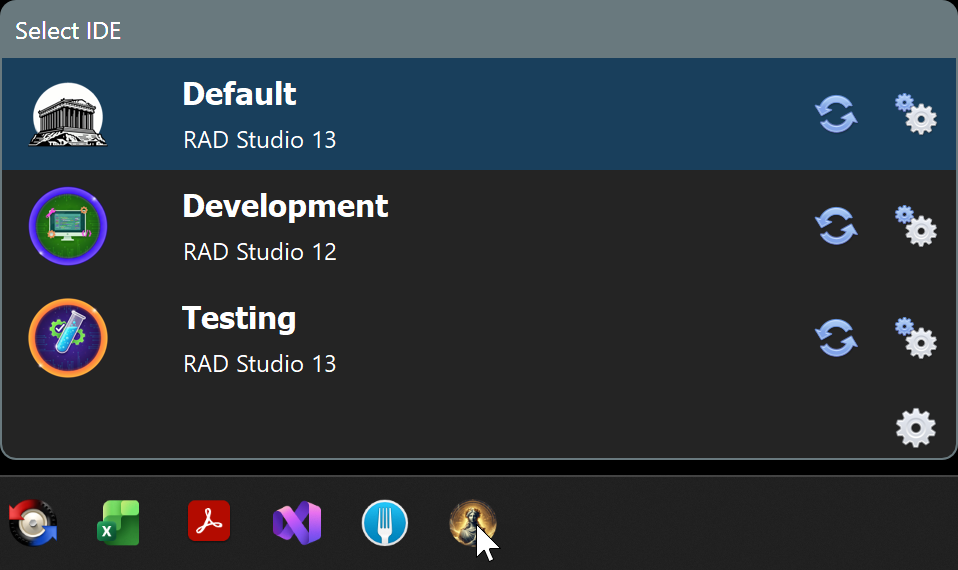
Tip
MultIDE stores its registry entries inside a multide subkey in the registry key. All registry entries you need to specify to start the IDE are in the form multide\<config-name>. The Default configuration is of course special, that's the normal Delphi and doesn't use a special registry key.
So if you created a my-test configuration in MultIDE, you need to add the following entry to tms.config.yaml:
# General options that are not 'per product'.
tms smart setup options:

  # installs the component in an alternate place so you can have different components installed in the same Delphi.
  # see https://stackoverflow.com/questions/9290131/starting-delphi-with-an-alternate-registry-key
  alternate registry key: multide\my-test
Download it from https://github.com/agallero/multide