Custom drawing
The Appearance objects restyle the planner declaratively, but
some effects need per-pixel control: a colored accent strip on every item, a
shaded weekend column, a dashed outline for tentative bookings, or a completely
bespoke item look. For those, the planner exposes a family of draw events on
TTMSFNCPlanner that hand you the live
TTMSFNCGraphics canvas and the rectangle being painted. Reach for custom drawing only when an appearance property cannot
express the effect — it runs on every repaint, so keep the handlers cheap. This
guide explains the before/after model the events follow, then builds up from a
simple overlay to fully taking over an item's rendering.
How planner drawing works
Almost every visual area has a pair of events: a OnBeforeDraw* event that
fires before the planner paints, and a OnAfterDraw* event that fires after.
The pattern is the same across cells, items, headers, the time-line, and the
current-time marker:
OnAfterDraw*is the easy entry point. The area is already painted; you draw on top. There is nothing to cancel — just add your overlay.OnBeforeDraw*gives twovarparameters that control the default rendering:AAllow— set toFalseto skip the area entirely (it is not drawn and, for items, you usually still want it selectable).ADefaultDraw— set toFalseto suppress only the built-in painting so you render the area yourself, while the planner still treats it as drawn.
All handlers receive the TTMSFNCGraphics canvas (set Fill, Stroke, and
Font, then call DrawRectangle / DrawText / DrawEllipse) and an ARect
in control coordinates. Cell and time events also carry the AStartTime /
AValue and an AKind (TTMSFNCPlannerCacheItemKind)
so you can tell a grid cell (ikCell) from a header band.
Adding an overlay
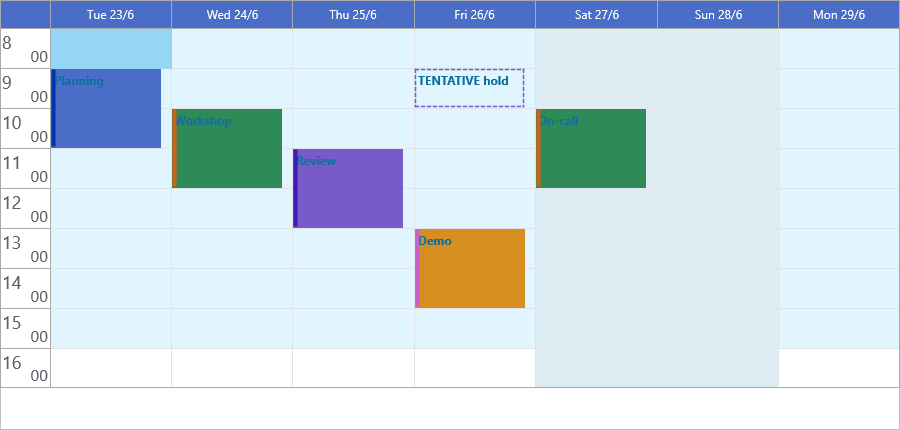
The lowest-risk customization is an after-draw overlay: let the planner paint the
item, then add a detail. This handler paints an accent strip down the left edge of
every item in a darker shade of the item's own Color (using Darker from
FMX.TMSFNCGraphicsTypes):
procedure TForm1.WireItemAccent;
begin
  // After-draw runs once the planner has painted the item, so anything drawn
  // here sits on top of the default rendering.
  Planner1.OnAfterDrawItem := PlannerAfterDrawItem;
end;

procedure TForm1.PlannerAfterDrawItem(Sender: TObject;
  AGraphics: TTMSFNCGraphics; ARect: TRectF; AItem: TTMSFNCPlannerItem);
var
  bar: TRectF;
begin
  // A strip down the left edge, in a darker shade of the item's own color.
  // Darker is declared in FMX.TMSFNCGraphicsTypes.
  bar := RectF(ARect.Left, ARect.Top, ARect.Left + 5, ARect.Bottom);
  AGraphics.Fill.Kind := gfkSolid;
  AGraphics.Fill.Color := Darker(AItem.Color, 40);
  AGraphics.Stroke.Kind := gskNone;
  AGraphics.DrawRectangle(bar);
end;
Shading cells by date
OnAfterDrawCell fires for each grid cell with its AStartTime, so you can tint
cells by date or time. This handler shades Saturday and Sunday with a translucent
overlay, filtering on AKind = ikCell so header bands are left alone:
procedure TForm1.WireWeekendShading;
begin
  Planner1.OnAfterDrawCell := PlannerAfterDrawCell;
end;

procedure TForm1.PlannerAfterDrawCell(Sender: TObject;
  AGraphics: TTMSFNCGraphics; ARect: TRectF; ACol, ARow: Integer;
  AStartTime, AEndTime: TDateTime; APosition: Integer;
  AKind: TTMSFNCPlannerCacheItemKind);
begin
  // Only shade actual grid cells, not header bands.
  if AKind <> ikCell then
    Exit;

  // DayOfWeek returns 1 = Sunday .. 7 = Saturday.
  if DayOfWeek(AStartTime) in [1, 7] then
  begin
    AGraphics.Fill.Kind := gfkSolid;
    AGraphics.Fill.Color := gcGainsboro;
    AGraphics.Fill.Opacity := 0.35;   // translucent so grid lines show through
    AGraphics.Stroke.Kind := gskNone;
    AGraphics.DrawRectangle(ARect);
    AGraphics.Fill.Opacity := 1.0;     // restore for later drawing
  end;
end;
Tip
Restore any canvas state you change (here Fill.Opacity) at the end of the
handler. The same TTMSFNCGraphics instance is reused for later areas in the
same repaint, so a left-over opacity or color bleeds into them.
Putting it together
This example combines all three drawing hooks: OnBeforeDrawItem draws
"tentative" items as a dashed outline and clears ADefaultDraw to suppress the
built-in body fill (the planner still draws the title in its separate text pass),
while the accent overlay and weekend shading from the previous sections stay
wired. It shows the difference between replacing drawing (before-draw +
ADefaultDraw := False) and augmenting it (after-draw):
procedure TForm1.WireCustomRendering;
begin
  Planner1.OnBeforeDrawItem := PlannerBeforeDrawItem;
  Planner1.OnAfterDrawItem := PlannerAfterDrawItem;   // accent bar, see WireItemAccent
  Planner1.OnAfterDrawCell := PlannerAfterDrawCell;   // weekend shading
end;

procedure TForm1.PlannerBeforeDrawItem(Sender: TObject;
  AGraphics: TTMSFNCGraphics; ARect: TRectF; AItem: TTMSFNCPlannerItem;
  var AAllow: Boolean; var ADefaultDraw: Boolean);
begin
  // For tentative items, render a dashed outline ourselves and suppress the
  // default fill by clearing ADefaultDraw. Other items draw normally.
  if AItem.Title.StartsWith('TENTATIVE') then
  begin
    AGraphics.Fill.Kind := gfkNone;
    AGraphics.Stroke.Kind := gskDash;
    AGraphics.Stroke.Color := AItem.Color;
    AGraphics.DrawRectangle(ARect);
    // Suppress only the default body fill; the planner still draws the title
    // in its separate text pass, so we do not draw it again here.
    ADefaultDraw := False;
  end;
  // AAllow stays True so the item is still hit-testable and selectable.
end;
Pitfalls
AAllowvsADefaultDraw.AAllow := Falseremoves the area completely;ADefaultDraw := Falsekeeps the area but lets you draw it. Mixing them up either hides content you meant to redraw or double-draws it.- Reset the canvas.
Fill,Stroke,Font, andOpacitypersist on the sharedTTMSFNCGraphicsacross the repaint. Set every property you rely on, and restore anything unusual (low opacity, dashed strokes) before returning. - Draw handlers run on every repaint. Keep them allocation-free and fast; heavy work here makes scrolling and navigation stutter.
gfkNone/gskNonepaint nothing. As with appearance objects, aFillorStrokeleft at its*Nonekind draws nothing regardless of color.- Custom drawing layers over appearance, it does not replace it. Prefer an Appearance property when one exists; use draw events only for effects the appearance objects cannot express.
Related API
TTMSFNCPlanner—OnBeforeDrawItem,OnAfterDrawItem,OnBeforeDrawCell,OnAfterDrawCell,OnBeforeDrawItemText,OnAfterDrawItemText, and the matching header, time-line, group, and current-time draw eventsTTMSFNCGraphics—Fill,Stroke,Font,DrawRectangle,DrawText,DrawEllipse
See also
- Appearance — declarative styling; try this first
- Items — per-item color and state used by the accent overlay
- Interaction — hints and selection that pair with custom looks