Timeline
The TimeLine property on TTMSFNCPlanner
controls which time range the planner shows and how each time unit is labelled.
Reach for the timeline first whenever you set up a planner: it decides the row
duration (five-minute slots versus full days), the visible window, the working
hours that stay highlighted, and the date the view is anchored to. Get the
timeline right and the rest of the component — items, appearance, interaction —
falls into place on a correct grid. This guide explains the unit-index model the
timeline uses, then walks through each setting with verified, compilable
examples.
The timeline model
The planner timeline is unit based, not date based. Two properties define how long one row lasts:
TimeLine.DisplayUnitType— aTTMSFNCPlannerDisplayUnitTypevalue:pduMilliSecond,pduSecond,pduMinute,pduHour, orpduDay.TimeLine.DisplayUnit— anIntegercount of those units per row.
So DisplayUnitType = pduMinute with DisplayUnit = 30 (the defaults) produces
30-minute rows. Every other timeline boundary is then expressed as a zero-based
row index counted from midnight, not as a TDateTime:
| Property | Type | Meaning |
|---|---|---|
DisplayStart |
Integer |
Index of the first visible row from midnight. Default 0. |
DisplayEnd |
Integer |
Index of the last visible row from midnight. Default 47. |
ActiveStart |
Integer |
Start of the active (non-greyed) band. Default 16. |
ActiveEnd |
Integer |
End of the active band. Default 40. |
ViewStart |
TDateTime |
The actual date/time anchor shown at the top of the view. |
With the defaults (30-minute rows), index 0 is 00:00, index 47 is 23:30
(48 rows = 24 hours), and the active band 16..40 is 08:00–20:00. The only
TDateTime in the model is ViewStart, which decides which day you are looking
at; the indices decide which slice of the day and how finely it is divided.
Tip
To convert a clock time to a row index, divide the minutes since midnight by the
row duration. For 60-minute rows, 07:00 is index 7; for 15-minute rows, 08:00
is index 32.
Display units and row duration
Set DisplayUnitType and DisplayUnit together to choose the row duration, then
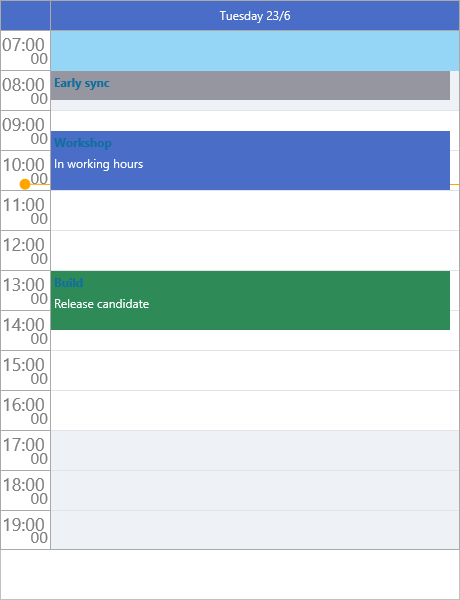
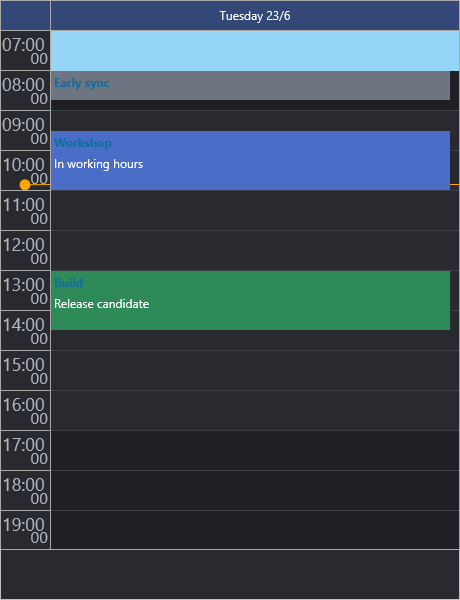
pick the visible window and active hours as row indices. The example below builds
a single-day view with one row per hour, visible from 07:00 to 19:00, with
09:00–17:00 highlighted as working hours:
procedure TForm1.ConfigureDayTimeline;
begin
  Planner1.BeginUpdate;
  try
    Planner1.Mode := pmDay;

    // Row duration = DisplayUnit * DisplayUnitType. 60 minutes -> one row per hour.
    Planner1.TimeLine.DisplayUnitType := pduMinute;
    Planner1.TimeLine.DisplayUnit := 60;

    // DisplayStart/DisplayEnd are zero-based row indices counted from midnight.
    // With 60-minute rows, index 7 = 07:00 and index 19 = 19:00.
    Planner1.TimeLine.DisplayStart := 7;
    Planner1.TimeLine.DisplayEnd := 19;

    // The active (non-greyed) band, also a unit count from midnight: 09:00-17:00.
    Planner1.TimeLine.ActiveStart := 9;
    Planner1.TimeLine.ActiveEnd := 17;

    // ViewStart is the TDateTime anchor: which day the timeline shows.
    Planner1.TimeLine.ViewStart := Date;

    Planner1.TimeLine.DisplayUnitFormat := 'hh:nn';
    Planner1.TimeLine.CurrentTimeMode := pctmLine;
  finally
    Planner1.EndUpdate;
  end;
end;
DisplayUnitSize sets the row height in logical pixels if you need taller or
denser rows than the default.
Visible range and the date anchor
DisplayStart and DisplayEnd clip the vertical window to a slice of the day,
which keeps long timelines readable — there is no point scrolling through the
small hours of a business calendar. ViewStart is independent: it sets the
TDateTime the view is anchored to. Change ViewStart to move to another day or
period without touching the row indices.
DisplayOffset (with DisplayOffsetType) shifts the displayed window by a fixed
amount — useful when a "day" should begin at, say, 06:00 rather than midnight.
Multi-day and week views
In pmMultiDay mode the planner renders one position (column) per day. Use
Positions.Count to set how many days are shown and Positions.Format to format
the day headers; ViewStart anchors the first day. The snippet below shows a
seven-day week starting on Monday and enables the built-in navigation buttons:
procedure TForm1.ConfigureWeekView;
begin
  Planner1.BeginUpdate;
  try
    // Multi-day mode renders one column (position) per day.
    Planner1.Mode := pmMultiDay;
    Planner1.Positions.Count := 7;
    Planner1.Positions.Format := 'ddd d/m';

    // Anchor the first day on the most recent Monday.
    Planner1.TimeLine.ViewStart := StartOfTheWeek(Date);

    // Show full hours, half-hour rows.
    Planner1.TimeLine.DisplayUnitType := pduMinute;
    Planner1.TimeLine.DisplayUnit := 30;
    Planner1.TimeLine.DisplayStart := 14;  // 07:00
    Planner1.TimeLine.DisplayEnd := 40;    // 20:00

    // Built-in previous/next buttons step the view by one period.
    Planner1.Interaction.TopNavigationButtons := [pnbPrevious, pnbNext];
  finally
    Planner1.EndUpdate;
  end;
end;

procedure TForm1.GoToNextWeek;
begin
  // Programmatic navigation advances ViewStart by one display period.
  Planner1.NavigateToNextDateTime;
end;
Mode accepts other layouts too — pmDay, pmDayPeriod, pmHalfDayPeriod,
pmMultiResDay, pmMultiDayRes, pmMonth, pmMultiMonth, and pmCustom
(driven by ModeSettings).
Active (working) range
The active range highlights the relevant part of the day; rows outside it are
drawn with the inactive fill. Both ActiveStart and ActiveEnd are row indices,
so they scale with the row duration:
{ Inside your form's OnCreate event, with 30-minute rows: }
Planner1.TimeLine.ActiveStart := 18;  // 09:00
Planner1.TimeLine.ActiveEnd := 36;    // 18:00
The active and inactive zones are styled through GridCellAppearance — see the
Appearance guide.
Current-time indicator
TimeLine.CurrentTimeMode decides how "now" is marked:
| Value | Description |
|---|---|
pctmNone |
No current-time indicator. |
pctmLine |
Draws a line at the current time (default). |
pctmText |
Draws the current time as a text label. |
TimeLine.CurrentTimePosition controls whether the indicator is drawn
pctpUnderItems (default) or pctpOverItems.
Header format
TimeLine.DisplayUnitFormat formats the major time-unit labels and
TimeLine.DisplaySubUnitFormat formats the finer sub-unit labels shown within
each major unit. Both take standard Delphi date/time format strings:
{ Inside your form's OnCreate event: }
Planner1.TimeLine.DisplayUnitFormat := 'hh:nn';   // 09:00, 10:00, ...
Planner1.TimeLine.DisplaySubUnitFormat := ':nn';  // :15, :30, :45
Navigation
Step the view with the programmatic methods, which move ViewStart by one
display period:
{ In a button handler or menu action: }
Planner1.NavigateToNextDateTime;      // forward one period
Planner1.NavigateToPreviousDateTime;  // back one period
Both methods accept an optional TDateTime to jump to a specific anchor instead
of stepping. To show the built-in arrow buttons, assign the
TTMSFNCPlannerNavigationButtons set on Interaction — it is a set of
pnbPrevious / pnbNext, not a Boolean:
{ Inside your form's OnCreate event: }
Planner1.Interaction.TopNavigationButtons := [pnbPrevious, pnbNext];
Planner1.Interaction.BottomNavigationButtons := [];  // none at the bottom
Time-line clicks
OnTimeLineClick and OnTimeLineDblClick report clicks on the time axis itself,
each handing you the ADateTime under the click. They are handy for jump-to-time
navigation or a double-click-to-create gesture on the axis. The handler below
double-clicks the axis to drop a one-hour appointment at that time:
procedure TForm1.WireTimeLineClicks;
begin
  Planner1.OnTimeLineClick := PlannerTimeLineClick;
  Planner1.OnTimeLineDblClick := PlannerTimeLineDblClick;
end;

procedure TForm1.PlannerTimeLineClick(Sender: TObject; ADateTime: TDateTime;
  AKind: TTMSFNCPlannerCacheItemKind);
begin
  // ADateTime is the time under the click on the axis.
  StatusBar1.Caption := 'Time clicked: ' + TimeToStr(ADateTime);
end;

procedure TForm1.PlannerTimeLineDblClick(Sender: TObject; ADateTime: TDateTime;
  AKind: TTMSFNCPlannerCacheItemKind);
var
  it: TTMSFNCPlannerItem;
begin
  // Double-click the axis to drop a one-hour appointment starting at that time.
  it := Planner1.AddItem(ADateTime, IncHour(ADateTime, 1));
  it.Title := 'New appointment';
end;
Putting it together
This example combines several timeline features at once — 15-minute rows, split major/sub-unit headers, a clipped visible window, a highlighted shift, and an over-items current-time label — to build a dispatch-board timeline:
procedure TForm1.ConfigureDispatchTimeline;
begin
  Planner1.BeginUpdate;
  try
    Planner1.Mode := pmDay;

    // Fine-grained 15-minute rows.
    Planner1.TimeLine.DisplayUnitType := pduMinute;
    Planner1.TimeLine.DisplayUnit := 15;

    // Major header shows the hour; the sub-unit header shows the minutes.
    Planner1.TimeLine.DisplayUnitFormat := 'hh';
    Planner1.TimeLine.DisplaySubUnitFormat := ':nn';

    // Visible window 06:00-22:00 (15-min rows -> index 24..88).
    Planner1.TimeLine.DisplayStart := 24;
    Planner1.TimeLine.DisplayEnd := 88;

    // Highlight the staffed shift 08:00-18:00 (index 32..72).
    Planner1.TimeLine.ActiveStart := 32;
    Planner1.TimeLine.ActiveEnd := 72;

    // Draw the current time as a label on top of the items.
    Planner1.TimeLine.CurrentTimeMode := pctmText;
    Planner1.TimeLine.CurrentTimePosition := pctpOverItems;

    Planner1.TimeLine.ViewStart := Date;
    Planner1.Interaction.TopNavigationButtons := [pnbPrevious, pnbNext];
  finally
    Planner1.EndUpdate;
  end;
end;
Pitfalls
- Indices, not times.
DisplayStart,DisplayEnd,ActiveStart, andActiveEndare row indices, notTDateTimeor time-of-day values. AssigningEncodeTime(9, 0, 0, 0)toActiveStartdoes not set 09:00 — divide the minutes since midnight by the row duration instead. - The indices depend on
DisplayUnit. ChangingDisplayUnitrescales every index. After switching from 30-minute to 15-minute rows, anActiveStartof16moves from 08:00 to 04:00. Recompute the indices whenever you change the row duration. - Anchor with
ViewStart, notDisplayStart.DisplayStartonly clips the visible rows; the day shown isViewStart. SettingDisplayStartto a large number to "skip to a date" is a mistake. - Batch related changes. Wrap multiple timeline assignments in
BeginUpdate/EndUpdateso the planner repaints once instead of after every property.
Related API
TTMSFNCPlanner.TimeLine—DisplayUnit,DisplayUnitType,DisplayStart,DisplayEnd,ActiveStart,ActiveEnd,ViewStart,CurrentTimeMode,DisplayUnitFormatTTMSFNCPlanner—Mode,Positions,NavigateToNextDateTime,NavigateToPreviousDateTime,OnTimeLineClick,OnTimeLineDblClick
See also
- Items — scheduling items within the time range
- Appearance — styling the timeline header and active band
- Interaction — navigation buttons, keyboard, and touch