Working with blocks
Blocks are the nodes of a diagram. A block (TTMSFNCBloxBlock) combines
geometry, a shape, optional text, an optional picture, rotation, and link
points. This chapter shows how to set each of those so blocks render the way you
want and connect cleanly to lines. For appearance details (fill, stroke,
shadow, font) see Appearance; for connecting blocks see
Lines and linking.
Geometry
A block is positioned in blox coordinates with Left, Top, Width, and
Height (all Double). Right and Bottom are read-only conveniences, and
MinWidth / MinHeight clamp how small a user may resize the block.
procedure TForm1.AddSizedBlock;
var
  LBlock: TTMSFNCBloxBlock;
begin
  LBlock := TTMSFNCBloxBlock.Create;
  LBlock.Left := 60;
  LBlock.Top := 60;
  LBlock.Width := 180;
  LBlock.Height := 90;
  LBlock.MinWidth := 80;   { user cannot resize narrower than this }
  LBlock.MinHeight := 40;
  LBlock.Text := 'Sized block';
  BloxControl1.Blox.Add(LBlock);
end;
void __fastcall TForm1::AddSizedBlock()
{
  TTMSFNCBloxBlock *LBlock = new TTMSFNCBloxBlock();
  LBlock->Left = 60;
  LBlock->Top = 60;
  LBlock->Width = 180;
  LBlock->Height = 90;
  LBlock->MinWidth = 80;   // user cannot resize narrower than this
  LBlock->MinHeight = 40;
  LBlock->Text = "Sized block";
  BloxControl1->Blox->Add(LBlock);
}
Shapes
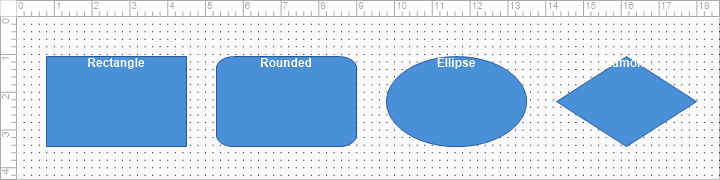
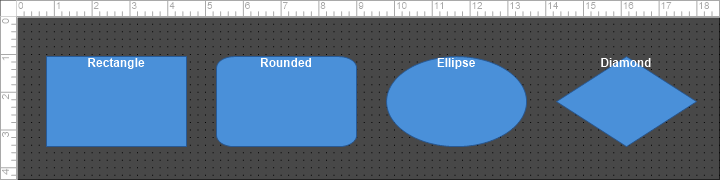
Shape selects the outline drawn for the block:
TTMSFNCBloxShapeType |
Renders as |
|---|---|
Rectangle |
A plain rectangle. |
RoundRect |
A rounded rectangle. |
Ellipse |
An ellipse / circle. |
Diamond |
A diamond (decision-style). |
SquareRound |
A square with rounded corners. |
NoShape |
No outline is drawn — useful for picture-only or text-only blocks. |
procedure TForm1.AddShapeRow;

  procedure AddShape(AShape: TTMSFNCBloxShapeType; AText: string; ALeft: Double);
  var
    LBlock: TTMSFNCBloxBlock;
  begin
    LBlock := TTMSFNCBloxBlock.Create;
    LBlock.Left := ALeft;
    LBlock.Top := 40;
    LBlock.Width := 130;
    LBlock.Height := 80;
    LBlock.Shape := AShape;
    LBlock.Text := AText;
    LBlock.FillColor := MakeGraphicsColor(74, 144, 217);
    LBlock.TextColor := gcWhite;
    BloxControl1.Blox.Add(LBlock);
  end;

begin
  BloxControl1.BeginUpdate;
  try
    AddShape(Rectangle, 'Rectangle', 40);
    AddShape(RoundRect, 'Rounded', 200);
    AddShape(Ellipse, 'Ellipse', 360);
    AddShape(Diamond, 'Diamond', 520);
  finally
    BloxControl1.EndUpdate;
  end;
end;
void __fastcall TForm1::AddShape(TTMSFNCBloxShapeType AShape, System::UnicodeString AText, double ALeft)
{
  TTMSFNCBloxBlock *LBlock = new TTMSFNCBloxBlock();
  LBlock->Left = ALeft;
  LBlock->Top = 40;
  LBlock->Width = 130;
  LBlock->Height = 80;
  LBlock->Shape = AShape;
  LBlock->Text = AText;
  LBlock->FillColor = MakeGraphicsColor(74, 144, 217);
  LBlock->TextColor = gcWhite;
  BloxControl1->Blox->Add(LBlock);
}

void __fastcall TForm1::AddShapeRow()
{
  BloxControl1->BeginUpdate();
  __try
  {
    AddShape(Fmx::Tmsfncbloxcoreblock::Rectangle, "Rectangle", 40);
    AddShape(Fmx::Tmsfncbloxcoreblock::RoundRect, "Rounded", 200);
    AddShape(Fmx::Tmsfncbloxcoreblock::Ellipse, "Ellipse", 360);
    AddShape(Fmx::Tmsfncbloxcoreblock::Diamond, "Diamond", 520);
  }
  __finally
  {
    BloxControl1->EndUpdate();
  }
}
Text
Set Text for a single string, or use Strings (a TStrings) for multi-line
content. Horizontal alignment is Alignment (taLeftJustify, taCenter,
taRightJustify), vertical alignment is VertAlign (vaTop, vaCenter,
vaBottom). WordWrap wraps long text, and ClipText restricts drawing to the
block's shape region. The FontName, FontSize, FontStyle, and TextColor
shortcuts style the text without reaching into the underlying font object.
procedure TForm1.AddTextBlock;
var
  LBlock: TTMSFNCBloxBlock;
begin
  LBlock := TTMSFNCBloxBlock.Create;
  LBlock.Left := 60;
  LBlock.Top := 60;
  LBlock.Width := 220;
  LBlock.Height := 120;
  LBlock.Shape := RoundRect;

  LBlock.Strings.Clear;
  LBlock.Strings.Add('Order received');
  LBlock.Strings.Add('Awaiting payment confirmation');

  LBlock.Alignment := TTMSFNCBloxAlignment.taCenter;
  LBlock.VertAlign := TTMSFNCBloxVertAlign.vaCenter;
  LBlock.WordWrap := True;
  LBlock.ClipText := True;

  LBlock.FontName := 'Segoe UI';
  LBlock.FontSize := 11;
  LBlock.FontStyle := [xsBold];
  LBlock.TextColor := MakeGraphicsColor(40, 40, 40);

  BloxControl1.Blox.Add(LBlock);
end;
void __fastcall TForm1::AddTextBlock()
{
  TTMSFNCBloxBlock *LBlock = new TTMSFNCBloxBlock();
  LBlock->Left = 60;
  LBlock->Top = 60;
  LBlock->Width = 220;
  LBlock->Height = 120;
  LBlock->Shape = Fmx::Tmsfncbloxcoreblock::RoundRect;

  LBlock->Strings->Clear();
  LBlock->Strings->Add("Order received");
  LBlock->Strings->Add("Awaiting payment confirmation");

  LBlock->Alignment = Fmx::Tmsfncbloxcoretextcell::taCenter;
  LBlock->VertAlign = Fmx::Tmsfncbloxcoretextcell::vaCenter;
  LBlock->WordWrap = true;
  LBlock->ClipText = true;

  LBlock->FontName = "Segoe UI";
  LBlock->FontSize = 11;
  LBlock->FontStyle = TTMSFNCBloxFontStyles() << Fmx::Tmsfncbloxcoretypes::xsBold;
  LBlock->TextColor = MakeGraphicsColor(40, 40, 40);

  BloxControl1->Blox->Add(LBlock);
}
Pictures
Any block can show a background picture through its Picture
(TTMSFNCBloxImage). Load it from a file, stream, URL, or resource, and use
PictureMode (Stretch or Center) to control sizing. To show only the
image with no shape outline, set Shape := NoShape.
procedure TForm1.AddPictureBlock;
var
  LBlock: TTMSFNCBloxBlock;
begin
  LBlock := TTMSFNCBloxBlock.Create;
  LBlock.Left := 60;
  LBlock.Top := 60;
  LBlock.Width := 160;
  LBlock.Height := 160;
  LBlock.Shape := NoShape;            { draw only the picture, no outline }
  LBlock.PictureMode := Center;       { or Stretch to fill the block }
  LBlock.Picture.LoadFromFile('logo.png');
  BloxControl1.Blox.Add(LBlock);
end;
void __fastcall TForm1::AddPictureBlock()
{
  TTMSFNCBloxBlock *LBlock = new TTMSFNCBloxBlock();
  LBlock->Left = 60;
  LBlock->Top = 60;
  LBlock->Width = 160;
  LBlock->Height = 160;
  LBlock->Shape = Fmx::Tmsfncbloxcoreblock::NoShape;            // draw only the picture, no outline
  LBlock->PictureMode = Fmx::Tmsfncbloxcoreblock::Center;       // or Stretch to fill the block
  LBlock->Picture->LoadFromFile("logo.png");
  BloxControl1->Blox->Add(LBlock);
}
Rotation
Angle rotates a block (in degrees); text, picture, and gradient rotate with
it. RotationStep sets the increment used while the user rotates interactively
(e.g. 45 to snap to diagonals), and RotationCenter positions the pivot in
relative percentage coordinates — (50, 50) is the block centre.
procedure TForm1.AddRotatedBlock;
var
  LBlock: TTMSFNCBloxBlock;
begin
  LBlock := TTMSFNCBloxBlock.Create;
  LBlock.Left := 80;
  LBlock.Top := 80;
  LBlock.Width := 160;
  LBlock.Height := 80;
  LBlock.Text := 'Rotated 45°';
  LBlock.RotationCenter := TMSFNCBloxPoint(50, 50); { pivot at the centre }
  LBlock.RotationStep := 45;                        { snap to 45° while rotating }
  LBlock.Angle := 45;
  BloxControl1.Blox.Add(LBlock);
end;
void __fastcall TForm1::AddRotatedBlock()
{
  TTMSFNCBloxBlock *LBlock = new TTMSFNCBloxBlock();
  LBlock->Left = 80;
  LBlock->Top = 80;
  LBlock->Width = 160;
  LBlock->Height = 80;
  LBlock->Text = "Rotated 45°";
  LBlock->RotationCenter = TMSFNCBloxPoint(50, 50); // pivot at the centre
  LBlock->RotationStep = 45;                        // snap to 45 degrees while rotating
  LBlock->Angle = 45;
  BloxControl1->Blox->Add(LBlock);
}
Link points
Link points are the anchors lines attach to. TTMSFNCBloxLinkableBlock ships
four (top, bottom, left, right); a plain TTMSFNCBloxBlock starts with none.
Add your own through the LinkPoints collection, positioning each relative to
the block's original rectangle:
procedure TForm1.AddBlockWithLinkPoints;
var
  LBlock: TTMSFNCBloxBlock;
  R: TTMSFNCBloxRect;
begin
  LBlock := TTMSFNCBloxBlock.Create;
  LBlock.Left := 60;
  LBlock.Top := 60;
  LBlock.Width := 160;
  LBlock.Height := 90;
  LBlock.Text := 'Linkable';

  { Position each point relative to the block's original rectangle. }
  { OriginalRect is protected; link points use the 0..100 original space. }
  R := TMSFNCBloxRect(0, 0, 100, 100);
  LBlock.LinkPoints.Clear;
  LBlock.LinkPoints.AddLink((R.Right - R.Left) / 2, R.Top, aoUp);
  LBlock.LinkPoints.AddLink((R.Right - R.Left) / 2, R.Bottom, aoDown);
  LBlock.LinkPoints.AddLink(R.Left, (R.Bottom - R.Top) / 2, aoLeft);
  LBlock.LinkPoints.AddLink(R.Right, (R.Bottom - R.Top) / 2, aoRight);

  BloxControl1.Blox.Add(LBlock);
end;
void __fastcall TForm1::AddBlockWithLinkPoints()
{
  TTMSFNCBloxBlock *LBlock = new TTMSFNCBloxBlock();
  LBlock->Left = 60;
  LBlock->Top = 60;
  LBlock->Width = 160;
  LBlock->Height = 90;
  LBlock->Text = "Linkable";

  // Position each point relative to the block's original rectangle.
  // OriginalRect is protected in C++; link points use the 0..100 original space.
  TTMSFNCBloxRect R = TMSFNCBloxRect(0, 0, 100, 100);
  LBlock->LinkPoints->Clear();
  LBlock->LinkPoints->AddLink((R.Right - R.Left) / 2, R.Top, Fmx::Tmsfncbloxcorelinkpoint::aoUp);
  LBlock->LinkPoints->AddLink((R.Right - R.Left) / 2, R.Bottom, Fmx::Tmsfncbloxcorelinkpoint::aoDown);
  LBlock->LinkPoints->AddLink(R.Left, (R.Bottom - R.Top) / 2, Fmx::Tmsfncbloxcorelinkpoint::aoLeft);
  LBlock->LinkPoints->AddLink(R.Right, (R.Bottom - R.Top) / 2, Fmx::Tmsfncbloxcorelinkpoint::aoRight);

  BloxControl1->Blox->Add(LBlock);
}
See Lines and linking for connecting lines to these points.
Putting it together
A real block usually sets several of these facets at once. This example combines geometry, a shape, multi-line aligned text, and a rotation on a single block:
procedure TForm1.AddConfiguredBlock;
var
  LBlock: TTMSFNCBloxBlock;
begin
  LBlock := TTMSFNCBloxBlock.Create;

  { Geometry }
  LBlock.Left := 80;
  LBlock.Top := 80;
  LBlock.Width := 200;
  LBlock.Height := 100;
  LBlock.MinWidth := 80;

  { Shape }
  LBlock.Shape := RoundRect;

  { Text }
  LBlock.Strings.Clear;
  LBlock.Strings.Add('Approved');
  LBlock.Strings.Add('Ready to ship');
  LBlock.Alignment := TTMSFNCBloxAlignment.taCenter;
  LBlock.VertAlign := TTMSFNCBloxVertAlign.vaCenter;
  LBlock.WordWrap := True;
  LBlock.FontStyle := [xsBold];
  LBlock.TextColor := gcWhite;
  LBlock.FillColor := MakeGraphicsColor(33, 183, 131);

  { Rotation }
  LBlock.RotationCenter := TMSFNCBloxPoint(50, 50);
  LBlock.Angle := -8;

  BloxControl1.Blox.Add(LBlock);
end;
void __fastcall TForm1::AddConfiguredBlock()
{
  TTMSFNCBloxBlock *LBlock = new TTMSFNCBloxBlock();

  // Geometry
  LBlock->Left = 80;
  LBlock->Top = 80;
  LBlock->Width = 200;
  LBlock->Height = 100;
  LBlock->MinWidth = 80;

  // Shape
  LBlock->Shape = Fmx::Tmsfncbloxcoreblock::RoundRect;

  // Text
  LBlock->Strings->Clear();
  LBlock->Strings->Add("Approved");
  LBlock->Strings->Add("Ready to ship");
  LBlock->Alignment = Fmx::Tmsfncbloxcoretextcell::taCenter;
  LBlock->VertAlign = Fmx::Tmsfncbloxcoretextcell::vaCenter;
  LBlock->WordWrap = true;
  LBlock->FontStyle = TTMSFNCBloxFontStyles() << Fmx::Tmsfncbloxcoretypes::xsBold;
  LBlock->TextColor = gcWhite;
  LBlock->FillColor = MakeGraphicsColor(33, 183, 131);

  // Rotation
  LBlock->RotationCenter = TMSFNCBloxPoint(50, 50);
  LBlock->Angle = -8;

  BloxControl1->Blox->Add(LBlock);
}
Pitfalls
- Geometry is in blox coordinates, not pixels. The on-screen size depends on
ZoomandDefaultUnit; convert withPresenter.ClientToCanvas/CanvasToClientwhen mapping mouse positions. - A picture-only block needs
Shape := NoShape, otherwise the shape outline draws over or around the image. - A plain block has no link points. Use
TTMSFNCBloxLinkableBlock, callCreateDefaultLinkPoints, or add points yourself before linking.